Let’s make a game! Game design is hard, but if you break up the process into small, achievable goals, you’ll be able to produce wonders. In this simple game tutorial, you will learn how to make a basic game from scratch. These are the essential skills that you will build on in future projects. You may watch the video tutorial, however you should come back here for the code examples.
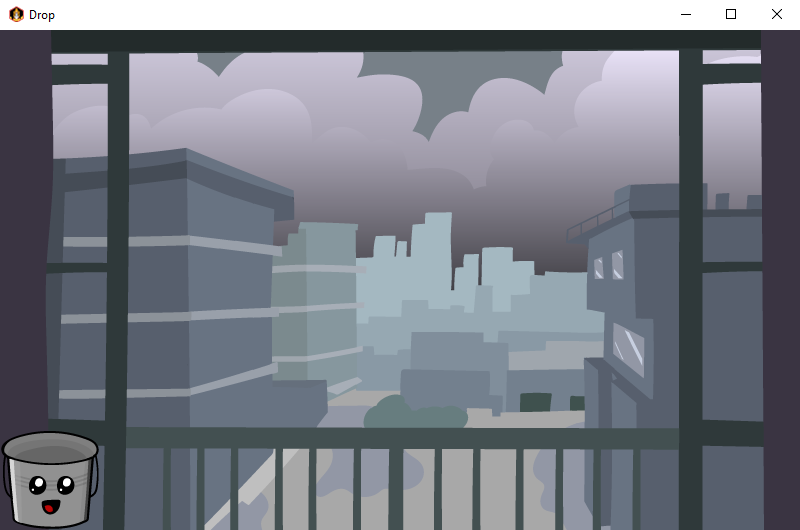
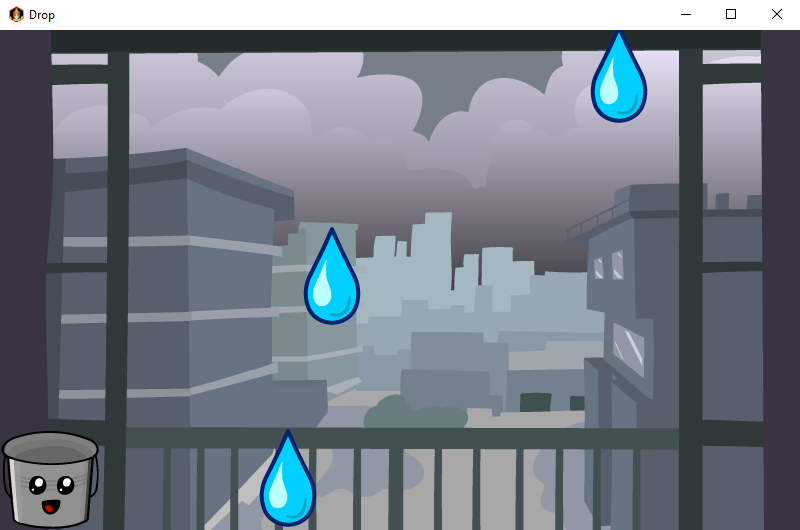
As you can see with the live demo, we’re going to make a basic game where you control a bucket to collect water droplets falling from the sky. There is no score or end goal. Just enjoy the experience! Here are the steps that we will use to split up the game design process:
- Prerequisites
- Loading Assets
- The Game Life Cycle
- Rendering
- Input Controls
- Game Logic
- Sound and Music
- Further Learning
- Full Example Code
Prerequisites
There are a few things that you need to do before you begin this tutorial.
- Make sure to follow the setup instructions on libgdx.com to configure Java and your IDE. You need to know how to create a project and run it with the appropriate Gradle commands.
- Create a project in GDX-Liftoff with the following settings:
- Project Name: Drop
- Package: com.badlogic.drop
- Main Class: Main
- Include the Core and Desktop platforms. You may include others, however they will not be discussed in this tutorial. Choosing other platforms at this stage can introduce new issues you are not prepared for.
- Use the ApplicationListener template
Open the project in your chosen IDE. If you have a knowledge of Java code, your experience in libGDX will be a lot easier. However, you should still be able to follow along in this tutorial even if you only have a minimal understanding of how code works.
Comments will be used throughout the code examples to explain the facets of this tutorial. You do not have to copy these comments when writing your code:
// This is a comment. It will be ignored by the compiler.
However, it is good practice to make your own comments to explain confusing code or to label parts of your design.
// Restrict bucket movement to the width of the viewport.
Import statements are an important part of Java programming. Thankfully, they are automatically added by modern IDE’s as you type your code. They are omitted in the examples, but assume they are necessary in your code. They appear at the top of the file under the package statement.
import com.badlogic.gdx.ApplicationListener;
import com.badlogic.gdx.Gdx;
import com.badlogic.gdx.Input.Keys;
import com.badlogic.gdx.InputProcessor;
import com.badlogic.gdx.audio.Music;
import com.badlogic.gdx.audio.Sound;
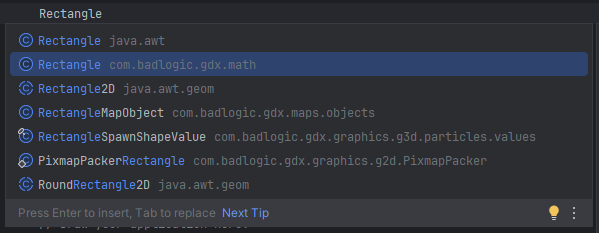
There are times where something named in libGDX is named the same as something found in another package. As you type Rectangle in IDEA, for example, it will prompt you to press alt+enter to autocomplete the import. Always opt for the libGDX named class in the subsequent menu. These are usually in the package com.badlogic.gdx
Decimal numbers in OpenGL based games (like those made with libGDX) are usually described with floating point variables like 22.5f. Forgetting the “f” can cause build errors. float is preferred over double (such as 22.5) because it uses less memory, it’s what’s supported by most hardware, and it’s what OpenGL usually expects. You can check what parameters a method expects by pressing ctrl+p in IDEA.
Whenever you see ellipses ... in the code examples below, assume that other code has been removed for brevity. Use the context of the lines you can see to figure out where you should be in the file. If you’re completely lost, the complete example is listed at the bottom.
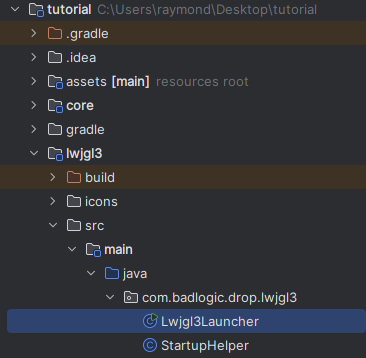
Before we can test our game, we should set the size of the desktop window. Any configuration that needs to happen for the desktop version of your game needs to be set in the LWJGL3Launcher class. Find this file in the project folder:
...

private static Lwjgl3ApplicationConfiguration getDefaultConfiguration() {
    Lwjgl3ApplicationConfiguration configuration = new Lwjgl3ApplicationConfiguration();
    configuration.setTitle("Drop");
    configuration.useVsync(true);
    configuration.setForegroundFPS(Lwjgl3ApplicationConfiguration.getDisplayMode().refreshRate + 1);
    configuration.setWindowedMode(800, 500); // this line changes the size of the window
    configuration.setWindowIcon("libgdx128.png", "libgdx64.png", "libgdx32.png", "libgdx16.png");

    return configuration;
}
Loading Assets
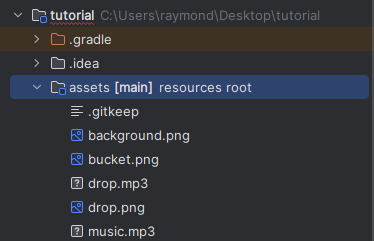
2D games made in libGDX need assets: images, audio, and other resources that comprise the project. In this case, we’ll need a bucket, a raindrop, a background, a water drop sound effect, and music. If you’re pretty resourceful, you can make these on your own. For simplicity’s sake, you can download these examples which are optimized for this tutorial.
bucket.png
drop.png
background.png
drop.mp3
music.mp3
Just having these saved on your computer is not enough. These files need to be placed in the assets folder of your project. Look inside the project folder:
There are many folders in here for the different backends that libGDX supports. Assets is a folder shared by all the backends. Whatever you save in here gets distributed with your game. For example, your desktop game will include these files inside your JAR distributable. This is what you give your users so they can play your game.
Note that file name casing and extensions are important in libGDX. There is a difference between drop.png, drop.mp3, and Drop.mp3. And annoyingly, this usually doesn’t break your game until you try to make a release. Always refer to the in-editor project browser as file extensions are hidden by default in the Windows File Explorer.
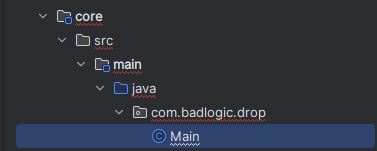
libGDX has an emphasis on code. Every asset you use must be loaded through code before you can use it in the rest of your game. This needs to happen when the game starts. Open the Core project > Main.java. This file is the main file we’re going to work in.
Declare your variables at the top of the file right underneath the public class Main line. You’ll need a variable for every asset you plan to use:
public class Main implements ApplicationListener {
    Texture backgroundTexture;
    Texture bucketTexture;
    Texture dropTexture;
    Sound dropSound;
    Music music;
However, you should not create these objects at the constructor or init level. This would fail because libGDX needs to load first. Enter the following code in the create method:
@Override
public void create() {
    backgroundTexture = new Texture("background.png");
    bucketTexture = new Texture("bucket.png");
    dropTexture = new Texture("drop.png");
}
This loads the assets into memory after libGDX has started. See that the background image is loaded as a texture. Textures are the way that games keep images in video ram. It’s actually not efficient to have different textures for each element in the game. It should be one big Texture for them all. Learn about TexturePacker in the wiki. For now, we’ll keep these as separate textures because it’s easier to explain this way.
Similarly, we have Sound to handle the raindrop audio file in our project. Sounds are loaded completely into memory so they can be played quickly and repeatedly. Music, on the other hand, is too large to keep entirely in memory. It’s streamed from the file in chunks. There is no precise rule about what should or should not be a sound versus a music, but you may consider any audio shorter than 10 seconds to be a sound.
@Override
public void create() {
    ...

    dropSound = Gdx.audio.newSound(Gdx.files.internal("drop.mp3"));
    music = Gdx.audio.newMusic(Gdx.files.internal("music.mp3"));
}
We have many assets to manage now. We should use an AssetManager to handle them. That can be found in the wiki too. Again, that’s outside the scope of this tutorial. Let’s keep it simple.
The Game Life Cycle
The work we’ve done so far is in the create method. Create executes immediately when the game is run, so of course it makes sense to load our assets there. What are these other methods for? The libGDX life cycle lists these in more detail.
create(), render(), resize(int width, int height), pause(), resume(), and dispose() are all included in your class because you are implementing the ApplicationListener interface. You will use these methods to create your game and all future games you make in libGDX. You’ll find that a lot of advanced systems you can use abstract the direct use of these methods, however these remain at the foundation of your code.
Most of the code in this example will be in the create and render methods. For example, we won’t be using dispose because it’s not necessary for us to clean up resources in a simple app like this. This is more relevant for games with multiple screens.
Rendering
Now let’s talk about rendering. For the most part, all modern games just manipulate textures, drawing them to the screen to give you the final image you see: the frame.
This process is repeated many times per second to give the illusion of motion. That’s what we’re going to do here. Let’s start with some boilerplate code. What is meant by boilerplate code is that you’ll use this same code again and again without much change. And you’ll see this pattern in all the games you make. Declare new variables:
public class Main implements ApplicationListener {
    ...

    SpriteBatch spriteBatch;
    FitViewport viewport;
Initialize these variables in the create method:
@Override
public void create() {
...
spriteBatch = new SpriteBatch();
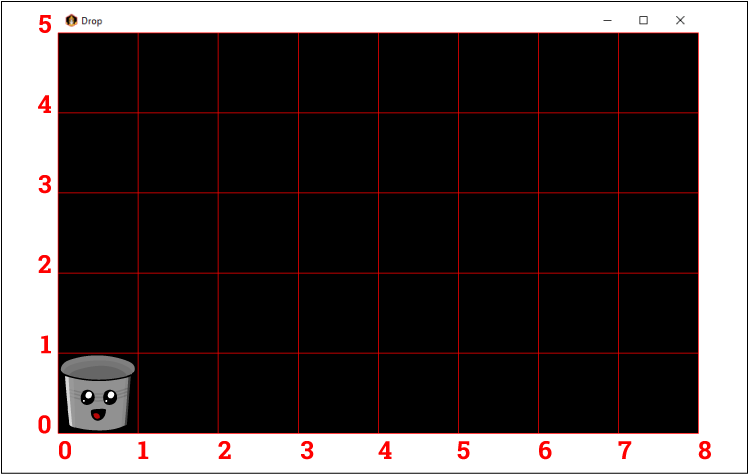
viewport = new FitViewport(8, 5);
}
A viewport controls how we see the game. It’s like a window from our world into another: the game world. The viewport controls how big this “window” is and how it’s placed on our screen. There are many kinds of viewports you can use. A simple one to understand is the FitViewport which will ensure that no matter what size our window is, the full game view will always be visible. The parameters determine how large our visible game world will be in game units. It will “fit” into the window. Each viewport also has a camera which controls what part of the game world is visible and at what zoom. Learn more about viewports and cameras in the wiki.
You should always remember to update the viewport in the resize method:
@Override
public void resize(int width, int height) {
    viewport.update(width, height, true); // true centers the camera
}
Our code is going to get more complex now. A good practice is to divide your code into separate methods. We’ll prepare for this by adding new methods to be used inside the render method:
@Override
public void render() {
    // organize code into three methods
    input();
    logic();
    draw();
}

private void input() {

}

private void logic() {

}

private void draw() {

}
We will focus on the draw() method for now.
private void draw() {
    ScreenUtils.clear(Color.BLACK);
    viewport.apply();
    spriteBatch.setProjectionMatrix(viewport.getCamera().combined);
    spriteBatch.begin();

    spriteBatch.end();
}
ScreenUtils.clear(Color.BLACK); clears the screen. It’s a good practice to clear the screen every frame. Otherwise, you’ll get weird graphical errors. You can use any color you want, but we’ll just settle on Black this time.
Ever wonder why your favorite games sometimes have poor FPS or Frames Per Second? Stuttering gameplay is often related to the number of textures being rendered and the capabilities of your player’s graphics card. There are tricks to alleviate this. For one, it is more efficient to send all your draw calls at once to the graphics processing unit (GPU). The process of drawing an individual texture is called a draw call. The SpriteBatch is how libGDX combines these draw calls together.
spriteBatch.setProjectionMatrix(viewport.getCamera().combined); shows how the Viewport is applied to the SpriteBatch. This is necessary for the images to be shown in the correct place.
It is important to order the begin and end lines appropriately. You should never draw from a SpriteBatch outside of a begin and an end. If you do, you will get an error message.
spriteBatch.begin();
// add lines to draw stuff here
spriteBatch.end();
So, let’s do that. The coordinates we provide determine where the bucket will be drawn on the screen. The coordinates begin in the bottom left and grow to the right and up. Our game world is described in imaginary units best defined as meters. For reference our bucket is 100 pixels wide and 100 pixels tall. For simplicity, we will decide that 100 pixels will equal 1 meter, making our bucket 1x1 meters. This ratio of pixels per meter can be anything you want, but make sure whatever you choose is a simple value that makes sense in your game world. This is typically the size of your tiles or the height of the player character. Your game logic should really know nothing about pixels.
Add the line to draw the bucket:
private void draw() {
    ScreenUtils.clear(Color.BLACK);
    viewport.apply();
    spriteBatch.setProjectionMatrix(viewport.getCamera().combined);
    spriteBatch.begin();

    spriteBatch.draw(bucketTexture, 0, 0, 1, 1); // draw the bucket with width/height of 1 meter

    spriteBatch.end();
}
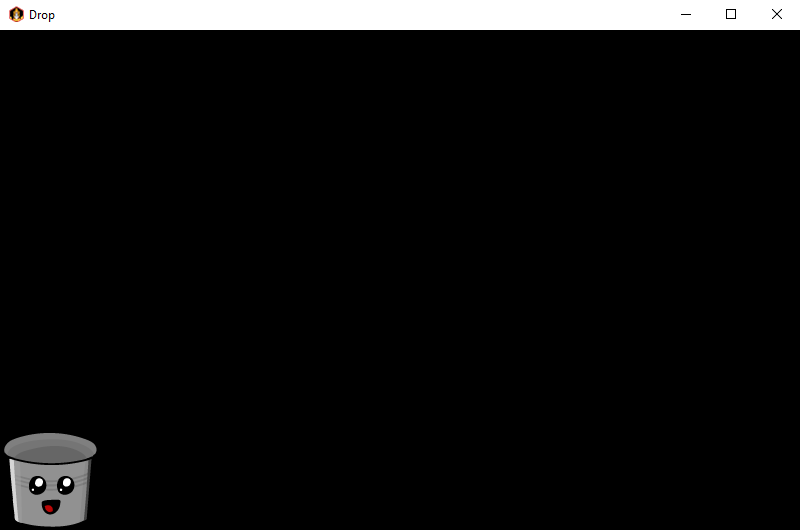
This code should now draw our bucket at the bottom of the screen in the lower left corner. You can run this game by calling the appropriate Gradle command in IDEA or implement whatever steps are needed for your chosen development environment as listed in the setup guide. If all things have gone well, you should see our brave, lone bucket sitting in the darkness of the void.
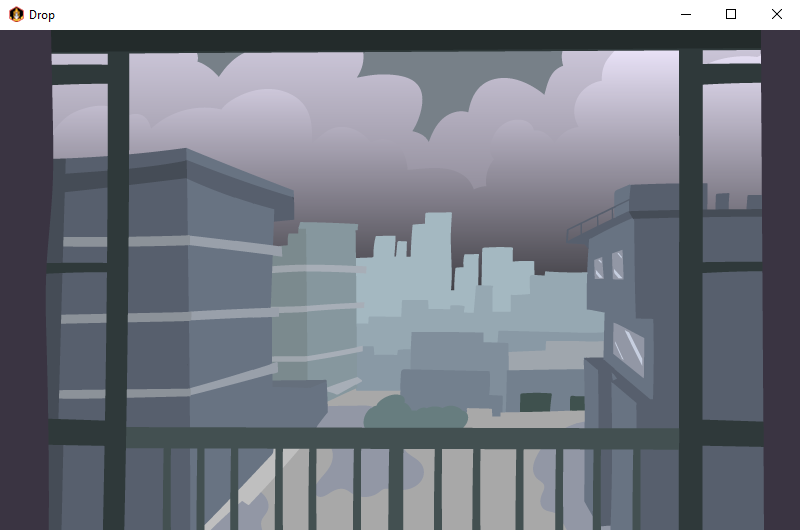
Let’s cheer up this scene with the background. Drawing the background is similar to drawing the bucket. It is drawn at the width/height of the viewport to ensure that the entire view is covered:
private void draw() {
    ScreenUtils.clear(Color.BLACK);
    viewport.apply();
    spriteBatch.setProjectionMatrix(viewport.getCamera().combined);
    spriteBatch.begin();

    // store the worldWidth and worldHeight as local variables for brevity
    float worldWidth = viewport.getWorldWidth();
    float worldHeight = viewport.getWorldHeight();

    spriteBatch.draw(bucketTexture, 0, 0, 1, 1); // draw the bucket
    spriteBatch.draw(backgroundTexture, 0, 0, worldWidth, worldHeight); // draw the background

    spriteBatch.end();
}
You can run the game and you’ll see the background.
But what happened to our bucket? We need to talk about draw order. Drawing happens consecutively in the order you list it in code. This is what really happens:
- The screen is cleared.
- The bucket is drawn to the back buffer.
- The background is drawn over everything. This final image is then shown on the screen.
This process is repeated every frame. To resolve this problem, we simply we need to reorder our draw calls.
private void draw() {
    ScreenUtils.clear(Color.BLACK);
    viewport.apply();
    spriteBatch.setProjectionMatrix(viewport.getCamera().combined);
    spriteBatch.begin();

    float worldWidth = viewport.getWorldWidth();
    float worldHeight = viewport.getWorldHeight();

    // rearrange these two lines
    spriteBatch.draw(backgroundTexture, 0, 0, worldWidth, worldHeight); // draw the background
    spriteBatch.draw(bucketTexture, 0, 0, 1, 1); // draw the bucket

    spriteBatch.end();
}
Ensure that your game shows the background and the bucket. We’ll skip rendering the droplets for now and return to it when we have the logic to create them.
Input Controls
It’s not fun to have a game without some sort of movement or action on screen. Let’s enable the player’s ability to control the bucket. As you know, there are all sorts of ways to get input from a user. We’ll focus on a few: the keyboard, mouse, and touch.
We need some way of keeping track of where the player bucket is in the game world. Texture does not store any position state. Sure, you can tell SpriteBatch where to draw it every frame by using the provided overloaded methods. What if you want to rotate it? Resize it? These methods get incredibly complicated the more you want to do.

Let’s use a Sprite instead. Sprite is capable of doing all these things and keeping state. This means that it will remember its properties instead of you having to define them every frame.
public class Main implements ApplicationListener {
    ...
    Sprite bucketSprite; // Declare a new Sprite variable
@Override
public void create() {
    ...
    bucketSprite = new Sprite(bucketTexture); // Initialize the sprite based on the texture
    bucketSprite.setSize(1, 1); // Define the size of the sprite
}
Erase the spriteBatch.draw(bucketTexture, 0, 0, 1, 1); line for the bucket. The Sprite draw code is written in a different way:
private void draw() {
    ScreenUtils.clear(Color.BLACK);
    viewport.apply();
    spriteBatch.setProjectionMatrix(viewport.getCamera().combined);
    spriteBatch.begin();

    float worldWidth = viewport.getWorldWidth();
    float worldHeight = viewport.getWorldHeight();

    spriteBatch.draw(backgroundTexture, 0, 0, worldWidth, worldHeight);
    bucketSprite.draw(spriteBatch); // Sprites have their own draw method

    spriteBatch.end();
}
If you run the game again, there shouldn’t be any difference in the output. That’s good! If you don’t see the bucket, make sure you adjusted the line indicated above correctly.
Keyboard
Now to capturing player input. This is how you detect if a player is pressing keys on the keyboard. This needs to happen in the input method
private void input() {
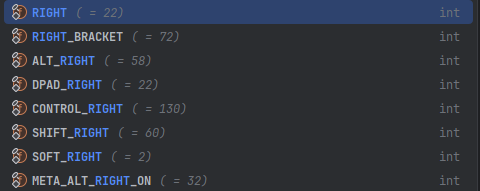
if (Gdx.input.isKeyPressed(Input.Keys.RIGHT)) {
// todo: Do something when the user presses the right arrow
}
}
This is known as keyboard polling. Every time a frame is drawn, we’re going to check if a key is pressed. There is a list of pretty much every conceivable key in Gdx.input.Input.Keys. We want to react to the user pressing the right arrow key.
That’s great, but what is supposed to happen when the key is pressed? We need to move the coordinates of the bucket sprite.
private void input() {
    float speed = .25f;

    if (Gdx.input.isKeyPressed(Input.Keys.RIGHT)) {
        bucketSprite.translateX(speed); // Move the bucket right
    }
}
The variable speed dictates how fast the bucket moves. Adding to the x makes the bucket move to the right. This basically means “set the bucket x to what it currently is right now plus a little bit more”. Subtracting from the x makes the bucket move to the left.
An unfortunate side effect of having our logic inside the render method is that our code behaves differently on different hardware. This is because of differences in framerate. More frames per second means more movement per second.
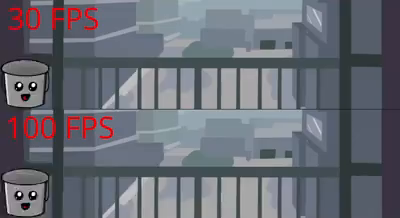
To counteract this, we need to use delta time. Delta time is the measured time between frames. If we multiply our movement by delta time, the movement will be consistent no matter what hardware we run this game on.
private void input() {
    float speed = .25f;
    float delta = Gdx.graphics.getDeltaTime(); // retrieve the current delta

    if (Gdx.input.isKeyPressed(Input.Keys.RIGHT)) {
        bucketSprite.translateX(speed * delta); // Move the bucket right
    }
}
This effectively means that the number we select here is how far the bucket moves in one second. Remember to use delta time whenever you are calculating something that happens over time. Adjust the number to a value that moves the bucket at an acceptable speed like 4f. Now let’s copy the code for movement to the left. Flip the plus to a minus to move to the left.
private void input() {
    float speed = 4f;
    float delta = Gdx.graphics.getDeltaTime();

    if (Gdx.input.isKeyPressed(Input.Keys.RIGHT)) {
        bucketSprite.translateX(speed * delta); // move the bucket right
    } else if (Gdx.input.isKeyPressed(Input.Keys.LEFT)) {
        bucketSprite.translateX(-speed * delta); // move the bucket left
    }
}
Run the game again to make sure you can move the bucket left and right with the keyboard.
Mouse and Touch Controls
Mouse and Touch controls are related. To react to the user clicking or tapping the screen, call the following method:
private void input() {
    float speed = 4f;
    float delta = Gdx.graphics.getDeltaTime();

    if (Gdx.input.isKeyPressed(Input.Keys.RIGHT)) {
        bucketSprite.translateX(speed * delta);
    } else if (Gdx.input.isKeyPressed(Input.Keys.LEFT)) {
        bucketSprite.translateX(-speed * delta);
    }

    if (Gdx.input.isTouched()) { // If the user has clicked or tapped the screen
        // todo:React to the player touching the screen
    }
}
Now the player has clicked the screen, but where did they click? We can use the methods Gdx.input.getX() and Gdx.input.getY() for this. Unfortunately, these values are in window coordinates which don’t correlate to our selected pixels per meter. The coordinates are also upside down because Window coordinates start from the top left. We need to declare a Vector2 object to do some math.
public class Main implements ApplicationListener {
    ...
    Vector2 touchPos;
Initialize the Vector2:
@Override
public void create() {
    ...

    touchPos = new Vector2();
}
Notice that we have created a single instance variable for the Vector2 instead of creating it locally. By reusing this Vector2, we prevent the game from triggering the garbage collector frequently which causes lag spikes in the game. This is how we use the Vector2 to move the bucket:
private void input() {
    float speed = 4f;
    float delta = Gdx.graphics.getDeltaTime();

    if (Gdx.input.isKeyPressed(Input.Keys.RIGHT)) {
        bucketSprite.translateX(speed * delta);
    } else if (Gdx.input.isKeyPressed(Input.Keys.LEFT)) {
        bucketSprite.translateX(-speed * delta);
    }

    if (Gdx.input.isTouched()) {
        touchPos.set(Gdx.input.getX(), Gdx.input.getY()); // Get where the touch happened on screen
        viewport.unproject(touchPos); // Convert the units to the world units of the viewport
        bucketSprite.setCenterX(touchPos.x); // Change the horizontally centered position of the bucket
    }
}
This converts the window coordinates to coordinates in our world space. This code actually supports mobile devices as well, however you should read about some other input features that libGDX provides you. Run the game and click the screen to move the bucket.
Game Logic
The player can move left and right now, but they can go completely off the screen. We need to prevent the player from doing that. libGDX provides some helpful methods in the MathUtils class. We can achieve our goal by using the clamp() method. Remember that the left side of the screen starts at 0. This code detects if the bucket goes too far left. If it does, it snaps its position at the farthest it’s allowed to go. Add the following lines to the logic method:
private void logic() {
    // Store the worldWidth and worldHeight as local variables for brevity
    float worldWidth = viewport.getWorldWidth();
    float worldHeight = viewport.getWorldHeight();

    // Clamp x to values between 0 and worldWidth
    bucketSprite.setX(MathUtils.clamp(bucketSprite.getX(), 0, worldWidth));
}
Try the game out. This kind of works, but it lets the bucket go just a little too far right. In fact, it’s one whole unit too far to the right. This is because the bucket sprite has an origin on the bottom left of the image. To resolve this, we need to subtract the width of the bucket from the right edge.
private void logic() {
    float worldWidth = viewport.getWorldWidth();
    float worldHeight = viewport.getWorldHeight();

    // Store the bucket size for brevity
    float bucketWidth = bucketSprite.getWidth();
    float bucketHeight = bucketSprite.getHeight();

    // Subtract the bucket width
    bucketSprite.setX(MathUtils.clamp(bucketSprite.getX(), 0, worldWidth - bucketWidth));
}
Now to spawn the rain drops. We will have more than one raindrop, so we need a list to keep track of them. Thankfully, libGDX has many useful collections to help with this. Declare the list:
public class Main implements ApplicationListener {
    ...
    Array<Sprite> dropSprites;
Initialize the list:
public void create() {
    ...

    dropSprites = new Array<>();
}
As before, it is advised to organize your code into methods. Create a new method to create a droplet. Place it after your draw method.
private void draw() {
    ...
}

private void createDroplet() {
    // create local variables for convenience
    float dropWidth = 1;
    float dropHeight = 1;
    float worldWidth = viewport.getWorldWidth();
    float worldHeight = viewport.getWorldHeight();

    // create the drop sprite
    Sprite dropSprite = new Sprite(dropTexture);
    dropSprite.setSize(dropWidth, dropHeight);
    dropSprite.setX(0);
    dropSprite.setY(worldHeight);
    dropSprites.add(dropSprite); // Add it to the list
}

@Override
public void pause() {

}
The size is the same as the player. Setting the y position at the top of the screen will make it appear as if it’s falling from the sky. The dropSprites.add(dropSprite); line adds the drop to the list of drops that we can manage in our render loop.
We’ll call createDroplet() in the create method.
public void create() {
    ...
    dropSprites = new Array<>();

    createDroplet();
}
Drawing each drop is pretty simple. Add the sprite drawing code to the draw method:
private void draw() {
    ScreenUtils.clear(Color.BLACK);
    viewport.apply();
    spriteBatch.setProjectionMatrix(viewport.getCamera().combined);
    spriteBatch.begin();

    float worldWidth = viewport.getWorldWidth();
    float worldHeight = viewport.getWorldHeight();

    spriteBatch.draw(backgroundTexture, 0, 0, worldWidth, worldHeight);
    bucketSprite.draw(spriteBatch);

    // draw each sprite
    for (Sprite dropSprite : dropSprites) {
        dropSprite.draw(spriteBatch);
    }

    spriteBatch.end();
}
If you run the program now, you’ll see nothing happen. That’s because the droplet doesn’t have any movement code. Begin coding the logic for the droplets after the bucket logic:
private void logic() {
    float worldWidth = viewport.getWorldWidth();
    float worldHeight = viewport.getWorldHeight();
    float bucketWidth = bucketSprite.getWidth();
    float bucketHeight = bucketSprite.getHeight();

    bucketSprite.setX(MathUtils.clamp(bucketSprite.getX(), 0, worldWidth - bucketWidth));

    float delta = Gdx.graphics.getDeltaTime(); // retrieve the current delta

    // loop through each drop
    for (Sprite dropSprite : dropSprites) {
        dropSprite.translateY(-2f * delta); // move the drop downward every frame
    }
}
We have a problem here. The rain drop only spawns on the left side every time. You could change the position, of course, but there is no variability. No randomness. We need it to be a random position between 0 and the width of the world.
private void createDroplet() {
    float dropWidth = 1;
    float dropHeight = 1;
    float worldWidth = viewport.getWorldWidth();
    float worldHeight = viewport.getWorldHeight();

    Sprite dropSprite = new Sprite(dropTexture);
    dropSprite.setSize(dropWidth, dropHeight);
    dropSprite.setX(MathUtils.random(0f, worldWidth - dropWidth)); // Randomize the drop's x position
    dropSprite.setY(worldHeight);
    dropSprites.add(dropSprite);
}
Again, we’re subtracting the width of the sprite so none of the raindrops appear outside of the view. Success!
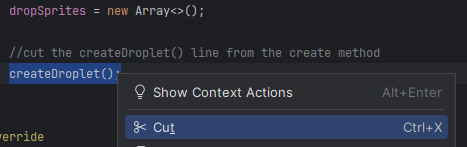
That’s only one droplet though. When it rains, we should have multiple droplets over the course of time. Let’s move the droplet spawning code to the logic method. This will make droplets repeatedly every frame. Cut the line from the create method:
Paste it into the logic method:
private void logic() {
    float worldWidth = viewport.getWorldWidth();
    float worldHeight = viewport.getWorldHeight();
    float bucketWidth = bucketSprite.getWidth();
    float bucketHeight = bucketSprite.getHeight();

    bucketSprite.setX(MathUtils.clamp(bucketSprite.getX(), 0, worldWidth - bucketWidth));

    float delta = Gdx.graphics.getDeltaTime();

    for (Sprite dropSprite : dropSprites) {
        dropSprite.translateY(-2f * delta);
    }

    // paste the line here
    createDroplet();
}
If you run this, you’ll see that we have a catastrophe! There are too many droplets.

There should be a delay between each spawn. Whenever we need something to be done repeatedly over time with a delay, we can create a timer. Declare a new variable to store the time:
public class Main implements ApplicationListener {
    ...
    float dropTimer;
dropTimer will keep track of how much time has elapsed between each spawn. Modify the code in the logic method:
private void logic() {
    float worldWidth = viewport.getWorldWidth();
    float worldHeight = viewport.getWorldHeight();
    float bucketWidth = bucketSprite.getWidth();
    float bucketHeight = bucketSprite.getHeight();

    bucketSprite.setX(MathUtils.clamp(bucketSprite.getX(), 0, worldWidth - bucketWidth));

    float delta = Gdx.graphics.getDeltaTime();

    for (Sprite dropSprite : dropSprites) {
        dropSprite.translateY(-2f * delta);
    }

    dropTimer += delta; // Adds the current delta to the timer
    if (dropTimer > 1f) { // Check if it has been more than a second
        dropTimer = 0; // Reset the timer
        createDroplet(); // Create the droplet
    }
}
dropTimer accumulates the time that passes between every frame. If it’s been more than a second, it will update the recorded time and proceed to create the droplet. This works as expected now.
These droplets will fall off the screen never to be seen again. Java doesn’t forget though. These droplets will remain in memory forever. If you profile your game you’ll see that we have a memory leak.
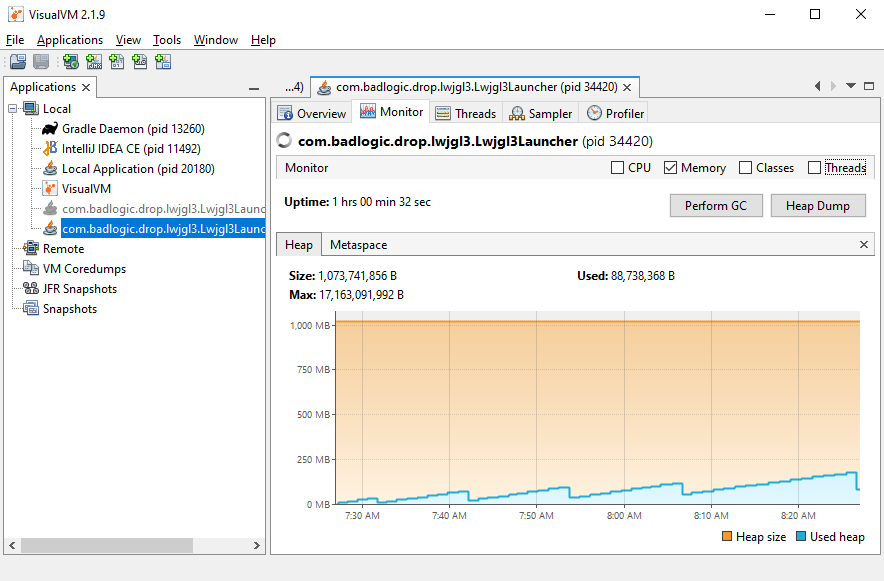
If the player would leave the game on for a really long time, it will crash. So, we should remove the drop sprite from the list when it falls off screen. We need to make some considerable modifications to the logic for loop. Erase your loop in the logic method:
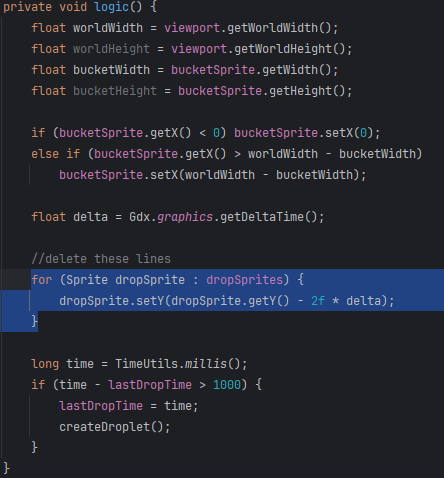
Replace it with the loop indicated below:
private void logic() {
    float worldWidth = viewport.getWorldWidth();
    float worldHeight = viewport.getWorldHeight();
    float bucketWidth = bucketSprite.getWidth();
    float bucketHeight = bucketSprite.getHeight();

    bucketSprite.setX(MathUtils.clamp(bucketSprite.getX(), 0, worldWidth - bucketWidth));

    float delta = Gdx.graphics.getDeltaTime();

    // Loop through the sprites backwards to prevent out of bounds errors
    for (int i = dropSprites.size - 1; i >= 0; i--) {
        Sprite dropSprite = dropSprites.get(i); // Get the sprite from the list
        float dropWidth = dropSprite.getWidth();
        float dropHeight = dropSprite.getHeight();

        dropSprite.translateY(-2f * delta);

        // if the top of the drop goes below the bottom of the view, remove it
        if (dropSprite.getY() < -dropHeight) dropSprites.removeIndex(i);
    }

    dropTimer += delta;
    if (dropTimer > 1f) {
        dropTimer = 0;
        createDroplet();
    }
}
Removing items in a list while you are iterating through it can cause some unforeseen bugs. That’s why we are iterating through the list backwards so you don’t skip any indexes. Make sure to learn about other collections available like the SnapshotArray and the DelayedRemovalArray for more complex projects.
We have made great progress, however the drops don’t interact with the bucket. This is where we incorporate some rudimentary collision detection. This can be achieved with the Rectangle class. We need two rectangles to make comparisons. One for the bucket and one to be reused with every drop.
public class Main implements ApplicationListener {
    ...
    Rectangle bucketRectangle;
    Rectangle dropRectangle;
@Override
public void create() {
    ...

    bucketRectangle = new Rectangle();
    dropRectangle = new Rectangle();
}
The code now sets the rectangles to the position and dimensions of the Sprites.
private void logic() {
    float worldWidth = viewport.getWorldWidth();
    float worldHeight = viewport.getWorldHeight();
    float bucketWidth = bucketSprite.getWidth();
    float bucketHeight = bucketSprite.getHeight();

    bucketSprite.setX(MathUtils.clamp(bucketSprite.getX(), 0, worldWidth - bucketWidth));

    float delta = Gdx.graphics.getDeltaTime();
    // Apply the bucket position and size to the bucketRectangle
    bucketRectangle.set(bucketSprite.getX(), bucketSprite.getY(), bucketWidth, bucketHeight);

    for (int i = dropSprites.size - 1; i >= 0; i--) {
        Sprite dropSprite = dropSprites.get(i);
        float dropWidth = dropSprite.getWidth();
        float dropHeight = dropSprite.getHeight();

        dropSprite.translateY(-2f * delta);
        // Apply the drop position and size to the dropRectangle
        dropRectangle.set(dropSprite.getX(), dropSprite.getY(), dropWidth, dropHeight);

        if (dropSprite.getY() < -dropHeight) dropSprites.removeIndex(i);
        else if (bucketRectangle.overlaps(dropRectangle)) { // Check if the bucket overlaps the drop
            dropSprites.removeIndex(i); // Remove the drop
        }
    }

    dropTimer += delta;
    if (dropTimer > 1f) {
        dropTimer = 0;
        createDroplet();
    }
}
bucketRectangle.overlaps(dropRectangle) checks if the bucket overlaps the drop. If it does, the Sprite will be removed from the list of drop Sprites. That means it will no longer be drawn or acted upon. It simply doesn’t exist anymore, making it look like the bucket collected it. Make sure your game works as expected. You’re almost done!
Sound and Music
It’s very easy to add a line to play a sound effect now that we are at the end of our workflow. We want the drop sound (the sound effect loaded at the beginning of this tutorial) to play when the bucket collides with the drop. It should not play when the drop falls out of the level.
private void logic() {
    float worldWidth = viewport.getWorldWidth();
    float worldHeight = viewport.getWorldHeight();
    float bucketWidth = bucketSprite.getWidth();
    float bucketHeight = bucketSprite.getHeight();

    bucketSprite.setX(MathUtils.clamp(bucketSprite.getX(), 0, worldWidth - bucketWidth));

    float delta = Gdx.graphics.getDeltaTime();
    bucketRectangle.set(bucketSprite.getX(), bucketSprite.getY(), bucketWidth, bucketHeight);

    for (int i = dropSprites.size - 1; i >= 0; i--) {
        Sprite dropSprite = dropSprites.get(i);
        float dropWidth = dropSprite.getWidth();
        float dropHeight = dropSprite.getHeight();

        dropSprite.translateY(-2f * delta);
        dropRectangle.set(dropSprite.getX(), dropSprite.getY(), dropWidth, dropHeight);

        if (dropSprite.getY() < -dropHeight) dropSprites.removeIndex(i);
        else if (bucketRectangle.overlaps(dropRectangle)) {
            dropSprites.removeIndex(i);
            dropSound.play(); // Play the sound
        }
    }

    dropTimer += delta;
    if (dropTimer > 1f) {
        dropTimer = 0;
        createDroplet();
    }
}
The music should play at the beginning of the game. It needs to loop continuously until the player is done playing the game. The file is also a little loud, so it should play at half volume. Volume is a value from 0f to 1f with 1f being the normal volume of the file.
@Override
public void create() {
    ...

    music.setLooping(true);
    music.setVolume(.5f);
    music.play();
}
Make sure your speakers are on and try it out.
Further learning
So, you’re at the final steps of making a game. You should test the game out. Tweak values to make the game easier or harder. This can be done by changing how fast the bucket moves and what rate the droplets spawn.
If you want to let your friends and colleagues try your game out, you’ll need to make a distributable that they can play. No one is going to want set up an IDE and copy your entire project just to play it. See the page on Deploying your application.
Now that you’ve completed the simple game, it’s time to extend the simple game. This project managed to put all of its code in a single class. This was in the service of making it simple, but it is a terrible way to organize code. The next tutorial will teach you about the Game class and how to implement Screen to arrange your project. It will also cover other important improvements to your game. For example, these instructions skipped the use of the dispose() method because it’s not relevant for single page project. When working with multiple screens, you may want to dispose of resources from the last screen to release the memory for new resources in your game.
Game design is a constant journey of learning. The wiki goes further in depth regarding all the subjects you have learned here. Look into collections, TexturePacker, AssetManager, audio, memory management, and user input.
This tutorial focused entirely on desktop development. There are many more considerations you must make before you explore Android, iOS, and HTML5 development. There is an extensive article on considerations for HTML5, for example. Java is not truly “write once, run anywhere” but libGDX takes you pretty close to that goal.
Full Example Code
The following is the full example code of the game described throughout this tutorial. It’s here for reference if you get stuck on any of the steps. Don’t cheat yourself by copying the whole thing! Learning how to program is mainly you asking yourself questions and trying to resolve issues on your own first.
package com.badlogic.drop;

import com.badlogic.gdx.ApplicationListener;
import com.badlogic.gdx.Gdx;
import com.badlogic.gdx.Input;
import com.badlogic.gdx.audio.Music;
import com.badlogic.gdx.audio.Sound;
import com.badlogic.gdx.graphics.Color;
import com.badlogic.gdx.graphics.Texture;
import com.badlogic.gdx.graphics.g2d.Sprite;
import com.badlogic.gdx.graphics.g2d.SpriteBatch;
import com.badlogic.gdx.math.MathUtils;
import com.badlogic.gdx.math.Rectangle;
import com.badlogic.gdx.math.Vector2;
import com.badlogic.gdx.utils.Array;
import com.badlogic.gdx.utils.ScreenUtils;
import com.badlogic.gdx.utils.viewport.FitViewport;

public class Main implements ApplicationListener {
    Texture backgroundTexture;
    Texture bucketTexture;
    Texture dropTexture;
    Sound dropSound;
    Music music;
    SpriteBatch spriteBatch;
    FitViewport viewport;
    Sprite bucketSprite;
    Vector2 touchPos;
    Array<Sprite> dropSprites;
    float dropTimer;
    Rectangle bucketRectangle;
    Rectangle dropRectangle;

    @Override
    public void create() {
        backgroundTexture = new Texture("background.png");
        bucketTexture = new Texture("bucket.png");
        dropTexture = new Texture("drop.png");
        dropSound = Gdx.audio.newSound(Gdx.files.internal("drop.mp3"));
        music = Gdx.audio.newMusic(Gdx.files.internal("music.mp3"));
        spriteBatch = new SpriteBatch();
        viewport = new FitViewport(8, 5);
        bucketSprite = new Sprite(bucketTexture);
        bucketSprite.setSize(1, 1);
        touchPos = new Vector2();
        dropSprites = new Array<>();
        bucketRectangle = new Rectangle();
        dropRectangle = new Rectangle();
        music.setLooping(true);
        music.setVolume(.5f);
        music.play();
    }

    @Override
    public void resize(int width, int height) {
        viewport.update(width, height, true);
    }

    @Override
    public void render() {
        input();
        logic();
        draw();
    }

    private void input() {
        float speed = 4f;
        float delta = Gdx.graphics.getDeltaTime();

        if (Gdx.input.isKeyPressed(Input.Keys.RIGHT)) {
            bucketSprite.translateX(speed * delta);
        } else if (Gdx.input.isKeyPressed(Input.Keys.LEFT)) {
            bucketSprite.translateX(-speed * delta);
        }

        if (Gdx.input.isTouched()) {
            touchPos.set(Gdx.input.getX(), Gdx.input.getY());
            viewport.unproject(touchPos);
            bucketSprite.setCenterX(touchPos.x);
        }
    }

    private void logic() {
        float worldWidth = viewport.getWorldWidth();
        float worldHeight = viewport.getWorldHeight();
        float bucketWidth = bucketSprite.getWidth();
        float bucketHeight = bucketSprite.getHeight();

        bucketSprite.setX(MathUtils.clamp(bucketSprite.getX(), 0, worldWidth - bucketWidth));

        float delta = Gdx.graphics.getDeltaTime();
        bucketRectangle.set(bucketSprite.getX(), bucketSprite.getY(), bucketWidth, bucketHeight);

        for (int i = dropSprites.size - 1; i >= 0; i--) {
            Sprite dropSprite = dropSprites.get(i);
            float dropWidth = dropSprite.getWidth();
            float dropHeight = dropSprite.getHeight();

            dropSprite.translateY(-2f * delta);
            dropRectangle.set(dropSprite.getX(), dropSprite.getY(), dropWidth, dropHeight);

            if (dropSprite.getY() < -dropHeight) dropSprites.removeIndex(i);
            else if (bucketRectangle.overlaps(dropRectangle)) {
                dropSprites.removeIndex(i);
                dropSound.play();
            }
        }

        dropTimer += delta;
        if (dropTimer > 1f) {
            dropTimer = 0;
            createDroplet();
        }
    }

    private void draw() {
        ScreenUtils.clear(Color.BLACK);
        viewport.apply();
        spriteBatch.setProjectionMatrix(viewport.getCamera().combined);
        spriteBatch.begin();

        float worldWidth = viewport.getWorldWidth();
        float worldHeight = viewport.getWorldHeight();

        spriteBatch.draw(backgroundTexture, 0, 0, worldWidth, worldHeight);
        bucketSprite.draw(spriteBatch);

        for (Sprite dropSprite : dropSprites) {
            dropSprite.draw(spriteBatch);
        }

        spriteBatch.end();
    }

    private void createDroplet() {
        float dropWidth = 1;
        float dropHeight = 1;
        float worldWidth = viewport.getWorldWidth();
        float worldHeight = viewport.getWorldHeight();

        Sprite dropSprite = new Sprite(dropTexture);
        dropSprite.setSize(dropWidth, dropHeight);
        dropSprite.setX(MathUtils.random(0f, worldWidth - dropWidth));
        dropSprite.setY(worldHeight);
        dropSprites.add(dropSprite);
    }

    @Override
    public void pause() {

    }

    @Override
    public void resume() {

    }

    @Override
    public void dispose() {

    }
}