Maps
libGDX features a generic maps API. All map related classes can be found in the com.badlogic.gdx.maps (code) package. The root package contains the base classes, sub-packages contain specialized implementations for tile maps and other forms of maps.
Base Classes
The set of base classes is meant to be generic so we can support not only tiled maps, but any 2D map format.
A map is a set of layers. A layer contains a set of objects. Maps, layers and objects have properties, that depend on the format they’ve been loaded from. For some formats there are specialized map, layer and object implementations, more on that later. The class hierarchy of the base classes looks as follows:
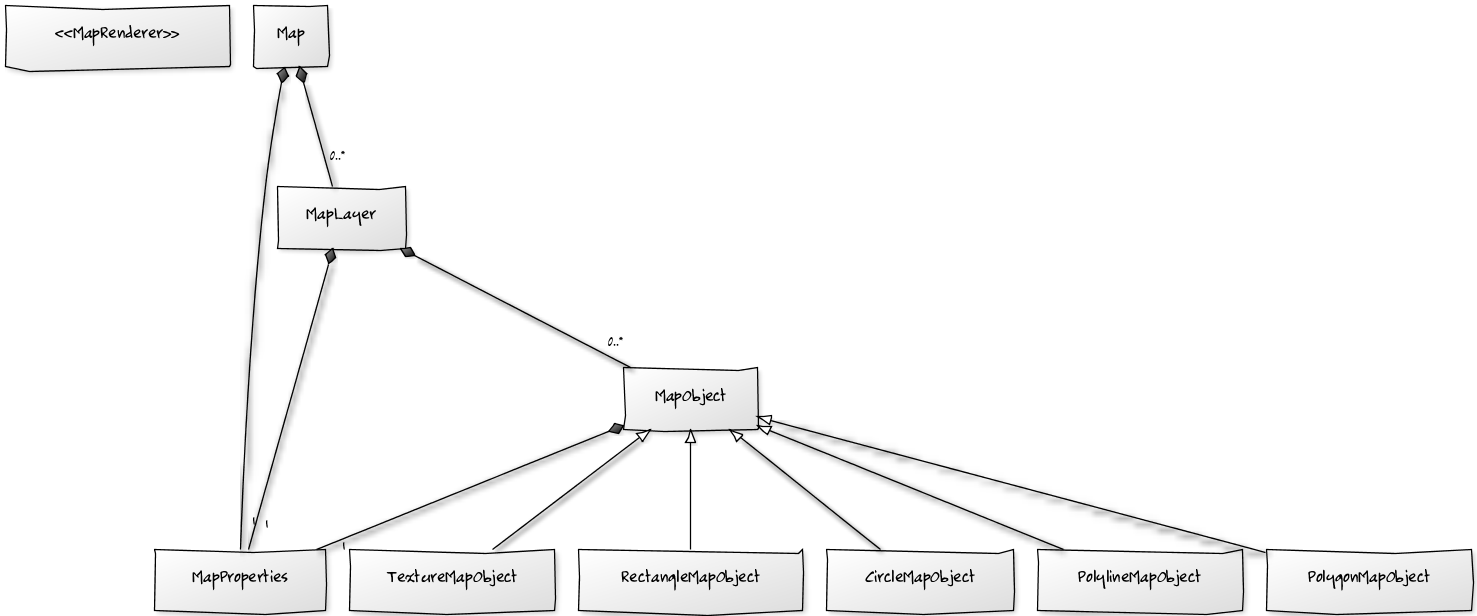
Properties
Properties of maps, layers or objects are represented by MapProperties (source). This class is essentially a hash map, with string keys and arbitrary values.
Which key/value pairs are available for a map, layer or object depends on the format from which it was loaded. To access properties, you can simply do the following:
map.getProperties().get("custom-property", String.class);
layer.getProperties().get("another-property", Float.class);
object.getProperties().get("foo", Boolean.class);
Many of the supported editors allow you to specify such properties on maps, layers and objects. What specific type these properties have is format specific. When in doubt, load up your map in your libGDX application, with one of the map loaders, and inspect the properties of the objects you are interested in.
Map Layers
Layers within a map are ordered and indexed, starting by index 0. You can access the layers of a map like this:
MapLayer layer = map.getLayers().get(0);
You can also search a layer by name
MapLayer layer = map.getLayers().get("my-layer");
These getter methods will always return a MapLayer. Some layers may be specialized and offer more functionality, in which case you can simply cast:
TiledMapTileLayer tiledLayer = (TiledMapTileLayer)map.getLayers().get(0);
A layer has a few attribute that we try to normalize for every supported map format:
String name = layer.getName();
float opacity = layer.getOpacity();
boolean isVisible = layer.isVisible();
You can also modify these which may have an effect on how the layer is rendered.
In addition to these normalized attributes, you can also access the more generic properties, as described above.
To get the objects within the layer, simply call the following:
MapObjects objects = layer.getObjects();
The MapObjects (code) instance allows you to retrieve objects by name, index or type. You can also insert and remove objects on the fly.
Map Objects
The API already provides a handful of specialized map objects, such as CircleMapObject (code), PolygonMapObject (code) and so on.
The loader of a map format will parse these objects and put them in their respective MapLayer (code).
For all supported formats, we try to extract the following normalized attributes for every object:
String name = object.getName();
float opacity = object.getOpacity();
boolean isVisible = object.isVisible();
Color color = object.getColor();
The specialized map objects, like PolygonMapObject may also have aditional attributes, e.g.
Polygon poly = polyObject.getPolygon();
Changing any of these attributes may have an effect on how the object is rendered.
As in the case of maps and layers, you can also access the more generic properties, as described above.
Note: tiles of a tiled map are not stored as map objects. There are specialized layer implementations that store these kind of objects more efficiently, see below. Objects as described above are generally used to define trigger areas, spawn points, collision shapes and so on.
Map Renderer
The MapRenderer (code) interface defines methods that allow you to render the layers and objects of a map.
Before you can start rendering, you have to set the view on your map. Think of the view as window through which you look. The easiest way to achieve this, is to tell the map renderer about an OrthographicCamera it should use:
mapRenderer.setView(camera);
Alternatively you can also specify a projection matrix and the view boundaries manually:
mapRenderer.setView(projectionMatrix, startX, startY, endX, endY);
The view boundaries are given in the x/y plane, with the y-axis pointing upwards. The units used are specific to the map and format it was loaded from.
To render all layers of the map you can then simply call:
mapRenderer.render();
If you need more control over which layers should be rendered, you can specify the indices of layers you want to render. Assuming you have 3 layers, two background layers and a foreground layer, and you want to render your custom sprites between the foreground and background layer, you can do this:
int[] backgroundLayers = { 0, 1 }; // don't allocate every frame!
int[] foregroundLayers = { 2 };    // don't allocate every frame!
mapRenderer.render(backgroundLayers);
renderMyCustomSprites();
mapRenderer.render(foregroundLayers);
By rendering each layer separately and modifying the view for every layer, you can also achieve a parallax effect.
Tiled Maps
Maps that contain layers with tiles are handled by the classes in the com.badlogic.gdx.maps.tiled package. The package contains loaders for different formats.
Tile maps are loaded into TiledMap (code) instances. TiledMap is a subclass of the generic Map class, with additional methods and attributes.
Tiled Map Layers
Layers with tiles in them are stored in TiledMapTileLayer (code) instances. In order to get access to the tiles, you will have to cast:
TiledMap tiledMap = loadMap(); // see below for this
TiledMapTileLayer layer = (TiledMapTileLayer)tiledMap.getLayers().get(0); // assuming the layer at index 0 contains tiles
A TiledMapTileLayer has all the same attributes as the generic MapLayer, e.g. properties, objects and so on.
In addition to those, the TiledMapTileLayer also has a two dimensional array of TiledMapTileLayer.Cell (code) instances.
To access a cell, you can ask the tile layer to hand it out like this:
Cell cell = tileLayer.getCell(column, row);
Where column and row specify the location of the cell. These are integer indices. The tiles are supposed to be in a y-up coordinate system. The bottom left tile of a map would thus be located at (0,0), the top right tile at (tileLayer.getWidth()-1, tileLayer.getHeight()-1).
If no tile exists at that position, or if the column/row arguments are out of bounds, null will be returned.
You can query the number of horizontal and vertical tiles in a layer by:
int columns = tileLayer.getWidth();
int rows = tileLayer.getHeight();
Cells
A cell is a container for a TiledMapTile (code). The cell itself stores a reference to a tile in addition to attributes that specify if the tile should be rotated or flipped when rendering it.
Tiles are usually shared by multiple cells.
Tilesets & Tiles
A TiledMap contains one or more TiledMapTileSet (code) instances. A tile set contains a number of TiledMapTile (code) instances. There are multiple implementations of tiles, e.g. static tiles, animated tiles etc. You can also create your own implementation for special purposes.
Cells in a tile layer reference these tiles. Cells within a layer can reference tiles of multiple tile sets. It is however recommended to stick to a single tile set per layer to reduce texture switches.
Rendering Tiled Maps
To render a TiledMap and its layers, you will need one of the specialized MapRenderer implementations. For orthogonal or top down maps, use OrthogonalTiledMapRenderer (code), for isometric maps use IsometricTiledMapRenderer (code). Other renderers in this package are experimental, we do not advise to use them at this point.
Creating such a renderer works like this:
float unitScale = 1 / 16f;
OrthogonalTiledMapRenderer renderer = new OrthogonalTiledMapRenderer(map, unitScale);
The renderer will only ever be able to render the map you pass to it in the constructor. This coupling allows the renderer to perform optimizations for this specific map, and cache them.
The unit scale tells the renderer how many pixels map to a single world unit. In the above case 16 pixels would equal one unit. If you want a pixel to map to a unit, unitScale would have to be one, and so on.
The unit scale is a way to couple your rendering coordinate system with your logical or world coordinate system.
A small example: assume you have a tile map, where tiles are 32x32 pixels wide. In your logical representation of the world, you want these to map to 1x1 unit squares. You’d specify 1/32f as your unit scale. You can now setup your camera to also operate on that unit scale. Say you want to view 30x20 tiles of your map on screen, then you can create your camera like this:
OrthographicCamera camera = new OrthographicCamera();
camera.setToOrtho(false, 30, 20);
Working with isometric maps is analogous, just create an IsometricTiledMapRenderer:
renderer = new IsometricTiledMapRenderer(isoMap, 1 / 32f);
Again, you have to specify the map (which should be an isometric tiled map) and a unit scale.
Note: the isometric renderer is experimental, use at your own risk and please report any issues you find. From a performance perspective, rendering isometric maps on mobile devices is very costly, as every tile must have blending on.
Loading TMX/Tiled maps
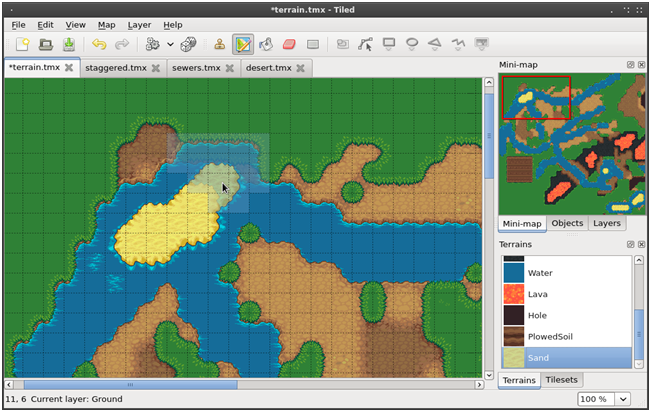
Tiled is a generic tile map editor for Windows/Linux/Mac OS X that allows you to create tile layers as well as object layers, containing arbitrary shapes for trigger areas and other purposes. libGDX provides a loader to read files generated by Tiled.
To load a Tiled map you have two options: either load it directly or via the AssetManager. The first option works like this:
TiledMap map = new TmxMapLoader().load("level1.tmx");
This will load the file called level1.tmx from the internal file storage (the assets directory). If you want to load a file using a different file type, you have to supply a FileHandleResolver in the constructor of the TmxMapLoader.
TiledMap map = new TmxMapLoader(new ExternalFileHandleResolver()).load("level1.tmx");
We chose this mechanism as the TmxMapLoader can also be used with the AssetManager class, where FileHandleResolvers rule the earth. To load a TMX map via the AssetManager, you can do the following:
// only needed once
assetManager.setLoader(TiledMap.class, new TmxMapLoader(new InternalFileHandleResolver()));
assetManager.load("level1.tmx", TiledMap.class);

// once the asset manager is done loading
TiledMap map = assetManager.get("level1.tmx");
Once loaded you can treat the map just like an other TiledMap.
Note if you load your TMX map directly, you are responsible for calling TiledMap#dispose() once you no longer need it. This call will dispose of any textures loaded for the map.
Note if you want to use TMX maps with the GWT backend, you need to make sure the map is saved with pure base64 encoding. The compressed TMX formats will not work due to limitations in GWT.
Note libGDX does not support infinite size for TMX maps (see #5764). Use only size-limited TMX maps.
Loading TiledMapPacker Atlas TMX/TMJ Tiled maps
The libGDX TiledMapPacker and AtlasTmxMapLoader have been around for years, but with recent updates it’s been expanded to include more feature’s and well as better documentation on how to use it.
Maps processed by TiledMapPacker must be loaded using the AtlasTmxMapLoader or AtlasTmjMapLoader classes instead of the standard map loaders. These specialized loaders recognize the extra atlas property embedded in the map file, ensuring tilesets, image layers, and collection-of-images tilesets are properly loaded from the generated TextureAtlas.
Using these loaders reduces draw calls, minimizes texture binds, and improves rendering efficiency. Especially for maps which heavily rely on image layers and multiple tilesets.
See the full TiledMapPacker documentation for usage instructions.
Loading Tide maps
Tide is another general purpose tile map editor, available for Windows only. libGDX provides a loader for the format output by Tide.
As with TMX files, you can either load a Tide map directly or through the asset manager:
// direct loading
map = new TideMapLoader().load("level1.tide");

// asset manager loading
assetManager.setLoader(TiledMap.class, new TideMapLoader(new InternalFileHandleResolver()));
assetManager.load("level1.tide", TiledMap.class);
Note if you load your Tide map directly, you are responsible for calling TiledMap#dispose() once you no longer need it. This call will dispose of any textures loaded for the map.
Performance considerations
While we try to make the renderers as fast as possible, there are a few things you can consider to boost rendering performance.
- Only use tiles from a single tile set in a layer. This will reduce texture binding.
- Mark tiles that do not need blending as opaque. At the moment you can only do this programmatically, we will provide ways to do it in the editor or automatically.
- Do not go overboard with the number of layers.