Setting up your project with Maven is possible, but crossplatform support is heavily limited, and only desktop is known to work. It has not been further tested or used by the libGDX community, and there is no official support if any issues should arise.
Introduction
The current automated LibGDX setup tool sets up a Gradle project, so to set up a Maven one for Desktop only, simply add the following dependencies to your project’s pom.xml:
  <dependency>
          <groupId>com.badlogicgames.gdx</groupId>
          <artifactId>gdx</artifactId>
          <version>1.12.1</version>
      </dependency>
        <dependency>
          <groupId>com.badlogicgames.gdx</groupId>
          <artifactId>gdx-backend-lwjgl3</artifactId>
          <version>1.12.1</version>
      </dependency>
      <dependency>
          <groupId>com.badlogicgames.gdx</groupId>
          <artifactId>gdx-platform</artifactId>
          <version>1.12.1</version>
          <classifier>natives-desktop</classifier>
      </dependency>
And you got all you need to start up an Lwjgl3Application providing your own implementation of an ApplicationAdapter.
Alternatively, an older method described below may provide some crossplatform capability, but you may have better luck changing your build system to Gradle at that point.
Using The Archetype
Setting up libGDX in general is non-trivial as it
- contains native libraries
- deploys to GWT
- deploys to Android
To handle these issues, libGDX relies on the following Maven plugins:
- GWT Maven plugin, version 2.5.0, to compile and package the GWT project.
- Maven native dependencies plugin, to copy the native libraries to the appropriate place
- Maven Android plugin, to compile and package the Android project.
To ease all of this, we supply a Maven archetype that will generate a multi-module Maven project.
Maven Archetype
The Maven archetype is currently not found in any repository. You can get it at https://github.com/libgdx/libgdx-maven-archetype and compile and install it yourself to your local Maven repository like this from your shell:
git clone git://github.com/libgdx/libgdx-maven-archetype.git
cd libgdx-maven-archetype
mvn install
To invoke the archetype, do the following:
mvn archetype:generate -DarchetypeGroupId=com.badlogic.gdx -DarchetypeArtifactId=gdx-archetype -DarchetypeVersion=1.2.0 -DgroupId=com.badlogic.test -DartifactId=test -Dversion=1.0-SNAPSHOT -Dpackage=com.badlogic.test -DJavaGameClassName=Test
The first three parameters specify the archetype, which has group id com.badlogic.gdx, artifact id gdx-archetype and a version (currently 1.0-SNAPSHOT).
The next parameters specify attributes of your project.
- groupId: your project’s group id
- artifactId: your project’s artifact id
- version: your project’s version
- package: your project’s main package
- JavaGameClassName: the name of your ApplicationListener class, and the prefix for platform starter classes, e.g. MyClassDesktop, MyClassAndroid etc.
For the parameters given above, you will end up with the following project structure (we’ll use this example in subsequent sections)
test/       <-- the base directory
   core/    <-- contains the apps core
   desktop/ <-- desktop starter & assets
   android/ <-- android starter
   html/    <-- HTML starter
   ios/     <- stub, not working at the moment
The core project contains your application code. The desktop project contains the assets folder which is shared across all other projects and the desktop starter class. The Android project contains the start-up code for Android and depends on the core project. The same is true for the HTML project. The iOS project is currently a stub and does not work yet.
Building & Deploying
Using Maven to build and deploy your application for the various backends is simple.
Desktop
To create a runnable jar file for the desktop, run:
mvn -Pdesktop package
This will create a file called test-desktop-1.0-SNAPSHOT-jar-with-dependencies.jar in the test/desktop/target folder. It contains all the necessary dependencies, the assets and a manifest file specifying the main class. You can run this file via:
java -jar test-desktop-1.0-SNAPSHOT-jar-with-dependencies.jar
Android
To create an unsigned APK for Android, run:
mvn -Pandroid package
This will create a file called test-android-1.0-SNAPSHOT.apk in the test/android/target folder. To install the apk to a connected device or emulator, run
mvn -Pandroid install
For more information on Android goals, see the Maven Android plugin
HTML5/GWT
To compile the HTML5 project to JavaScript, run:
mvn -Phtml package
The end result is located in the target/ folder. You can either use the .war file that was generated and deploy that to Jetty/Tomcat, or copy the contents of the HTML/target/test-html-1.0-SNAPSHOT/ folder to a location your web server can server(or even better, create a sym-link if you are on an appropriate OS). The war/folder contains all the compiled JavaScript code, the index HTML file and the assets.
To run and test the HTML5 project, run:
mvn -Phtml install
And browse to http://127.0.0.1:8080/index.html
IDE Integration
Eclipse, IntelliJ IDEA and NetBeans all support Maven projects in some form. The archetype goes to great lengths to make your libGDX project usable within Eclipse and IntelliJ IDEA. NetBeans is unsupported at the time of writing.
While Maven is IDE agnostic, the plugins for GWT and Android are not. Plugins for Eclipse differ in how the interpret the Maven configuration for GWT and Android projects from those in IntelliJ IDEA. The following sections describe how to import a project into both IDE’s after creating it using the libGDX archetype.
Eclipse
Before you can import your project, you need to install the following Eclipse plugins:
- m2e, this should already available in a clean Eclipse installation (Java and Java EE editions). It provides the basic Maven support within Eclipse.
- m2e-android provides Maven integration for Android projects in Eclipse.
- Google Web Toolkit, the Eclipse plugin that allows you to develop GWT projects.
Once the plugins are installed, you can import your Maven libGDX projects by going to File -> Import… -> Maven -> Existing Maven Projects. This will import the parent pom as project along with the core, desktop, android and html project.
Note that the HTML project might not be recognized as a GWT project by Eclipse. To fix this, right click the project, go to Properties -> Google -> Web Toolkit. Check “Use Google Web Toolkit”. Then go to Properties -> Google -> Web Application, check “This project has a WAR directory”, specify target/webapp and finally check “Launch and deploy from this directory”.
From there on you can run & debug just as you’d do if you setup your projects via the gdx-setup-ui.
If you change anything in the assets, you need to run “mvn -Phtml package” again and refresh the html project in Eclipse.
IntelliJ IDEA
Before you start, you should make sure IntelliJ IDEA knows where your Maven installation is located. Go to File -> Settings, and in the tree in the dialog chose Maven. Specify the directory where your Maven installation lives.
Once you created your project via the archetype you can import it into IntelliJ IDEA. Go to File -> Open Project, then navigate to the root directory of the project.
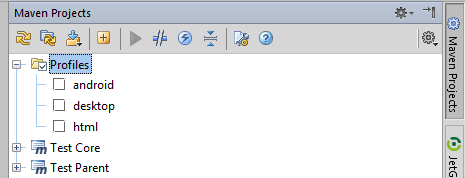
Once the project is loaded, you have to enable the profiles. Open the Maven Project view and check the three profiles, desktop, android and HTML.
To run the desktop project, create a new configuration via Run -> Edit Configurations. Create a new configuration by clicking the + button in the top left, and select Application. Set the Main class to the desktop starter class, and select the desktop module.
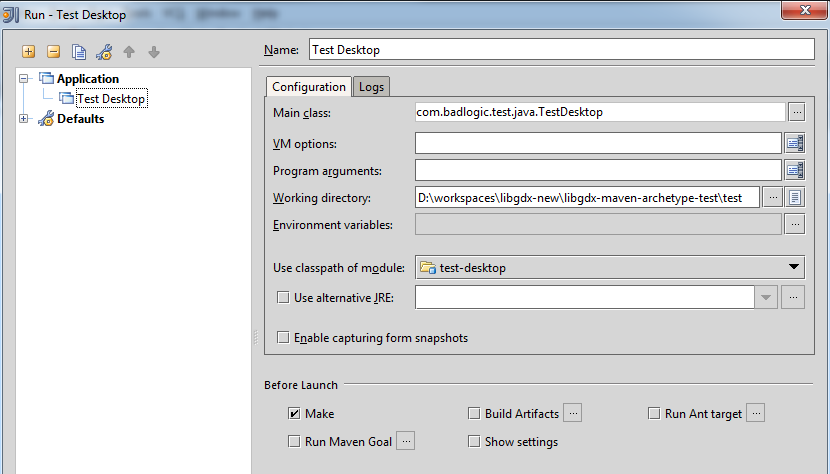
Launch this configuration to run your app on the desktop.
To run the android project, create a new configuration, this time selecting Android Application when creating the configuration. Select the Android module, then check Run Maven Goal and click on the … button to the right. In the dialog, select the Android project, then Lifecycle, and from the list of goals package. You can also set Target Device to Show chooser dialog so you get prompted whether to deploy to a device or an emulator.
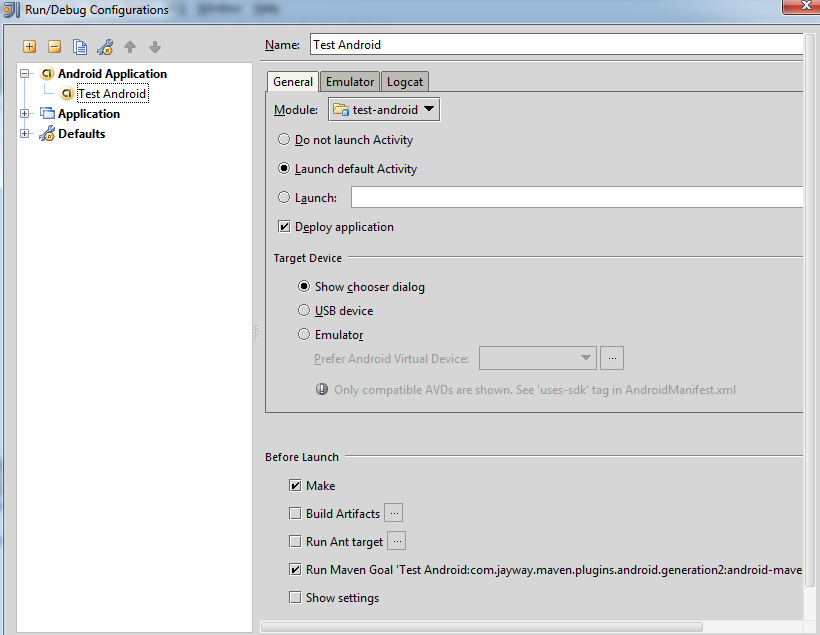
Launch this configuration to run your app on your Android device or emulator.