Masking is the technique of hiding portions of an image using the pixel information of another to decide whether a pixel of the original should or should not be shown. There’s more than one way to achieve this effect in libGDX.
Warning: If you are targeting Android, set the AndroidApplicationConfiguration’s alpha channel bits to 8 (default is 0) via configuration.a = 8 to ensure that all of these techniques work.
Table of Contents
- Masking using glScissor
- Masking using the ScissorStack
- Masking using the Depth Buffer
- Masking using Blending Function
- Masking using Pixmaps
- Masking using Shaders
- Masking using the BlendFuncSeparate
- Masking using Blending Function (Tinting)
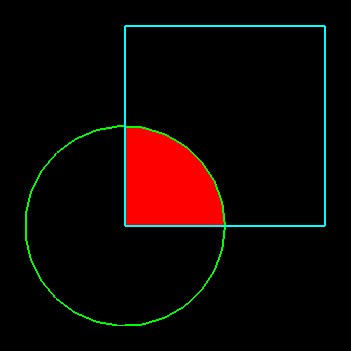
1. Masking using glScissor (Rectangle)
For the simplest of masking needs here’s a technique that allows us to create and apply a single rectangular mask using OpenGL’s Scissor Test. The Scissor Test is a Per-Sample Processing operation that discards Fragments that fall outside of a certain rectangular portion of the screen.
Step 1 - Preparations
private ShapeRenderer shapeRenderer;

@Override
public void create() {
    /* We can use a SpriteBatch or a ShapeRenderer to draw our masked elements. */
    shapeRenderer = new ShapeRenderer();
    shapeRenderer.setAutoShapeType(true);

    /* Increase the OpenGL line thickness for better visualization. */
    Gdx.gl.glLineWidth(2);
}
Step 2 - Drawing our masked elements
private void drawMasked() {
    /* To activate the scissor test, first enable the GL_SCISSOR_TEST enumerator.
     * Once enabled, pixels outside of the scissor box will be discarded. */
    Gdx.gl.glEnable(GL20.GL_SCISSOR_TEST);

    /* To define the scissor box, use this function: */
    Gdx.gl.glScissor(100, 100, 200, 200);
    /* The x and y is the window-space lower-left position of the scissor box,
     * and width and height define the size of the rectangle. */

    /* Draw our circle to be masked, we could also draw sprites with a SpriteBatch. */
    shapeRenderer.set(ShapeType.Filled);
    shapeRenderer.setColor(Color.RED);
    shapeRenderer.circle(100, 100, 100);

    /* Remember to flush before changing GL states again. */
    shapeRenderer.flush();

    /* Deactivate the scissor test before continuing with further rendering operations. */
    Gdx.gl.glDisable(GL20.GL_SCISSOR_TEST);
}
Step 3 - Drawing the contours for debugging purposes
private void drawContours() {
    shapeRenderer.set(ShapeType.Line);

    /* Draw the circle's contour for comparison. */
    shapeRenderer.setColor(Color.GREEN);
    shapeRenderer.circle(100, 100, 100);

    /* Draw the clipped area contour for comparison. */
    shapeRenderer.setColor(Color.CYAN);
    shapeRenderer.rect(100, 100, 200, 200);
}
Result
@Override
public void render() {
    shapeRenderer.begin();

    drawMasked();
    drawContours();

    shapeRenderer.end();
}
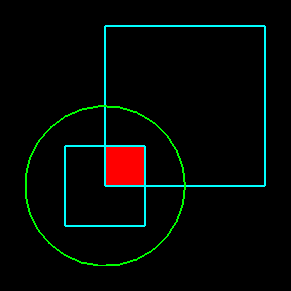
2. Masking using the ScissorStack (Rectangles)
A single rectangle could easily not be enough, here’s a technique that allows us to create and apply multiple rectangular masks using libGDX’s ScissorStack.
Step 1 - Preparations
/* Some attributes we're gonna need. */
private ShapeRenderer shapeRenderer;
private Rectangle scissors1, scissors2;

@Override
public void create() {
    /* The ScissorStack needs a camera to transform the clipping rectangles. */
    OrthographicCamera camera = new OrthographicCamera();
    camera.setToOrtho(false, CAMERA_WIDTH, CAMERA_HEIGHT);

    /* We can use a SpriteBatch or a ShapeRenderer to draw our masked elements. */
    shapeRenderer = new ShapeRenderer();
    shapeRenderer.setAutoShapeType(true);
    shapeRenderer.setProjectionMatrix(camera.combined);

    /* Increase the OpenGL line thickness for better visualization. */
    Gdx.gl.glLineWidth(2);

    /* scissors1 and scissors2 store the results of calculateScissors(...).
     * clipBounds is used to define the x, y, width and height of the clipping rectangles. */
    scissors1 = new Rectangle();
    Rectangle clipBounds = new Rectangle(100, 100, 200, 200);
    ScissorStack.calculateScissors(camera, shapeRenderer.getTransformMatrix(), clipBounds, scissors1);

    scissors2 = new Rectangle();
    clipBounds.set(50f, 50f, 100f, 100f);
    ScissorStack.calculateScissors(camera, shapeRenderer.getTransformMatrix(), clipBounds, scissors2);
}
Step 2 - Drawing our masked elements
private void drawMasked() {
    /* Feed the ScissorStack and store whether it could push the scissors or not. */
    boolean pop1 = ScissorStack.pushScissors(scissors1);
    boolean pop2 = ScissorStack.pushScissors(scissors2);

    /* Draw the elements to be constrained to an area,
     * without masking this would render a red filled circle. */
    shapeRenderer.set(ShapeType.Filled);
    shapeRenderer.setColor(Color.RED);
    shapeRenderer.circle(100, 100, 100);
    shapeRenderer.flush();

    /* Safety check for the situations the scissor fails to be pushed to the stack
     * (happens for example when the window is minimized on desktop or the clipping
     * area is <= 0). */
    if (pop1) {
        ScissorStack.popScissors();
    }
    if (pop2) {
        ScissorStack.popScissors();
    }
}
It is also possible to push multiple rectangles. Only the pixels of the sprites or shapes that are within all of the rectangles will be rendered.
Also, if your camera moves, you’ll need to recalculate the scissor area afterwards.
Step 3 - Drawing the contours for debugging purposes
private void drawContours() {
    shapeRenderer.set(ShapeType.Line);

    /* The rectangular mask. */
    shapeRenderer.setColor(Color.CYAN);
    shapeRenderer.rect(100, 100, 200, 200);
    shapeRenderer.rect(50, 50, 100, 100);

    /* The masked circle. */
    shapeRenderer.setColor(Color.GREEN);
    shapeRenderer.circle(100, 100, 100);
}
Result
@Override
public void render() {
    ScreenUtils.clear(Color.BLACK);

    shapeRenderer.begin();

    drawMasked();
    drawContours();

    shapeRenderer.end();
}
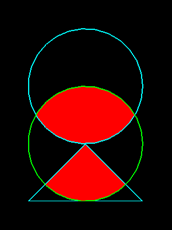
3. Masking using the Depth Buffer (Shapes)
Alright rectangles are great but our needs are greater what now. This upcoming technique allows us to create more diversely shaped masks using libGDX’s ShapeRenderer. You can use a SpriteBatch, but because the masks are built from the geometry of what you’re drawing it will not work as you expect. Texture regions will render as rectangles no matter what the image looks like.
Step 1 - Preparations
private ShapeRenderer shapeRenderer;

@Override
public void create() {
    /* We can use a SpriteBatch or a ShapeRenderer to draw our masked elements. */
    shapeRenderer = new ShapeRenderer();
    shapeRenderer.setAutoShapeType(true);

    /* Increase the OpenGL line thickness for better visualization. */
    Gdx.gl.glLineWidth(2);
}
Step 2 - Draw the mask elements to the depth buffer
private void drawMasks() {
    /* Clear our depth buffer info from previous frame. */
    Gdx.gl.glClear(GL20.GL_DEPTH_BUFFER_BIT);

    /* Set the depth function to LESS. */
    Gdx.gl.glDepthFunc(GL20.GL_LESS);

    /* Enable depth writing. */
    Gdx.gl.glEnable(GL20.GL_DEPTH_TEST);

    /* Disable RGBA color writing. */
    Gdx.gl.glColorMask(false, false, false, false);

    /* Render mask elements. */
    shapeRenderer.set(ShapeType.Filled);
    shapeRenderer.circle(100, 200, 100);
    shapeRenderer.triangle(0, 0, 100, 100, 200, 0);
    shapeRenderer.flush();
}
When using a SpriteBatch write this line right after SpriteBatch.begin() : Gdx.gl.glDepthMask(true);
Step 3 - Draw the masked elements
private void drawMasked() {
    /* Enable RGBA color writing. */
    Gdx.gl.glColorMask(true, true, true, true);

    /* Set the depth function to EQUAL. */
    Gdx.gl.glDepthFunc(GL20.GL_EQUAL);

    /* Render masked elements. */
    shapeRenderer.setColor(Color.RED);
    shapeRenderer.circle(100, 100, 100);
    shapeRenderer.flush();
}
Step 4 - Draw the contours for debugging purposes
private void drawContours() {
    /* Disable depth writing. */
    Gdx.gl.glDisable(GL20.GL_DEPTH_TEST);

    shapeRenderer.set(ShapeType.Line);

    /* The circle and triangle masks. */
    shapeRenderer.setColor(Color.CYAN);
    shapeRenderer.circle(100, 200, 100);
    shapeRenderer.triangle(0, 0, 100, 100, 200, 0);

    /* The masked circle. */
    shapeRenderer.setColor(Color.GREEN);
    shapeRenderer.circle(100, 100, 100);
}
Result
@Override
public void render() {
    ScreenUtils.clear(Color.BLACK);

    shapeRenderer.begin();

    drawMasks();
    drawMasked();
    drawContours();

    shapeRenderer.end();
}
4. Masking using Blending Function (Shapes or Textures)
For the demanding GDXer with complex masking needs, this technique allows us to have any mask imaginable and take the alpha channel into account for the first time! For this we’ll be using libGDX’s SpriteBatch.
Step 1 - Preparations
These are the images we’re gonna use:
| The mask | The sprite to mask |
|---|---|
 |
 |
The images in a black background for clarity:
| The mask | The sprite to mask |
|---|---|
 |
 |
/* Some attributes we're gonna need. */
private SpriteBatch spriteBatch;
private Sprite mask, maskedSprite;

@Override
public void create() {
    spriteBatch = new SpriteBatch();

    /* Load the mask containing the alpha information. */
    mask = new Sprite(new Texture("mask.png"));

    /* Load the sprite which will be masked. */
    maskedSprite = new Sprite(new Texture("sprite.png"));
    maskedSprite.setColor(Color.RED);
}
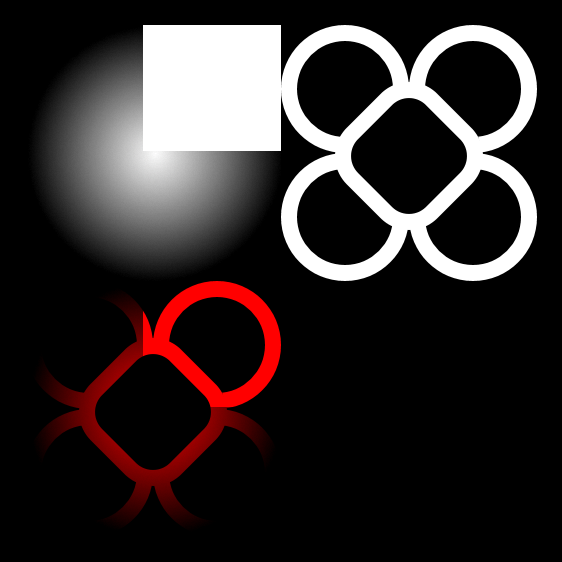
Step 2 - Draw the mask elements to the frame buffer
private void drawMasks() {
    /* Disable RGB color writing, enable alpha writing to the frame buffer. */
    Gdx.gl.glColorMask(false, false, false, true);

    /* Change the blending function for our alpha map. */
    spriteBatch.setBlendFunction(GL20.GL_ONE, GL20.GL_ZERO);

    /* Draw alpha masks. */
    mask.draw(spriteBatch);

    /* This blending function makes it so we subtract instead of adding to the alpha map. */
    spriteBatch.setBlendFunction(GL20.GL_ZERO, GL20.GL_SRC_ALPHA);

    /* Remove the masked sprite's inverse alpha from the map. */
    maskedSprite.draw(spriteBatch);

    /* Flush the batch to the GPU. */
    spriteBatch.flush();
}
Step 3 - Draw the masked elements
private void drawMasked() {
    /* Now that the buffer has our alpha, we simply draw the sprite with the mask applied. */
    Gdx.gl.glColorMask(true, true, true, true);

    /* Change the blending function so the rendered pixels alpha blend with our alpha map. */
    spriteBatch.setBlendFunction(GL20.GL_DST_ALPHA, GL20.GL_ONE_MINUS_DST_ALPHA);

    /* Draw our sprite to be masked. */
    maskedSprite.draw(spriteBatch);

    /* Remember to flush before changing GL states again. */
    spriteBatch.flush();
}
Step 4 - Draw the original sprites for debugging purposes
private void drawOriginals() {
    /* Switch to the default blend function */
    spriteBatch.setBlendFunction(GL20.GL_SRC_ALPHA, GL20.GL_ONE_MINUS_SRC_ALPHA);

    /* Draw the source images separately */
    spriteBatch.draw(mask, 0, 256);
    spriteBatch.draw(maskedSprite, 256, 256);
}
Result
@Override
public void render() {
    ScreenUtils.clear(Color.BLACK);

    spriteBatch.begin();

    drawMasks();
    drawMasked();
    drawOriginals();

    spriteBatch.end();
}
This example renders directly to the screen buffer, but it’s recommended that you render to a FrameBuffer object if you intend to draw anything underneath your masked elements.
5. Masking using Pixmaps (Shapes or Textures)
This technique allows the mask to be any image or shape and takes the alpha channel into account. This time we’ll be using the libGDX’s Pixmap class.
Step 1 - Preparations
private ShapeRenderer shapeRenderer;
private SpriteBatch spriteBatch;
private Texture masked, original;
private final int size = 256;

@Override
public void create() {
    /* The ShapeRenderer will only be used to draw the mask contours */
    shapeRenderer = new ShapeRenderer();
    shapeRenderer.setAutoShapeType(true);
    Gdx.gl20.glLineWidth(2);

    /* Needed to render our textures, a ShapeRenderer won't work with this technique. */
    spriteBatch = new SpriteBatch();

    /* The path to the image to mask. */
    FileHandle imagePath = new FileHandle("images/shared/weirdShape.png");

    /* Load the pixels of our image into a Pixmap. */
    Pixmap pixmap = new Pixmap(imagePath);

    /* Have an unaltered version for comparison. */
    original = new Texture(imagePath);

    /* Apply the mask to our Pixmap. */
    pixmap = applyMask(pixmap);

    /* Load the pixel information of the Pixmap into a Texture for drawing. */
    masked = new Texture(pixmap);
}
Step 2 - Applying the mask
private Pixmap applyMask(Pixmap source) {
    /* Create a Pixmap to store the mask information, at the end it will
     * contain the result. */
    Pixmap result = new Pixmap(source.getWidth(), source.getHeight(), Pixmap.Format.RGBA8888);

    /* This setting lets us overwrite the pixels' transparency. */
    result.setBlending(None);

    /* Ignore RGB values unless you want funky results, alpha is for the mask. */
    result.setColor(new Color(1f, 1f, 1f, 1f));

    /* Draw a circle to our mask, any shape is possible since
     * you can draw individual pixels to the Pixmap. */
    result.fillCircle(size / 2, size / 2, size / 2);

    /* Draw a rectangle with little alpha to our mask, this will turn
    * a corner of the original image transparent. */
    result.setColor(1f, 1f, 1f, 0.25f);
    result.fillRectangle(size / 2, size / 2, size / 2, size / 2);

    /* We can also define the mask by loading an image:
     * result = new Pixmap(new FileHandle("image.png")); */

    /* Decide the color of each pixel using the AND bitwise operator. */
    for (int x = 0; x < result.getWidth(); x++) {
        for (int y = 0; y < result.getHeight(); y++) {
            result.drawPixel(x, y, source.getPixel(x, y) & result.getPixel(x, y));
        }
    }

    return result;
}
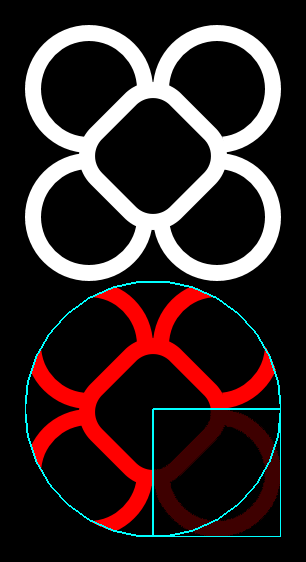
Step 3 - Drawing the original and masked images
private void drawImages() {
    /* Draw the original image for comparison. */
    spriteBatch.setColor(Color.WHITE);
    spriteBatch.draw(original, 0, size, size, size);

    /* Draw the masked image in red. */
    spriteBatch.setColor(Color.RED);
    spriteBatch.draw(masked, 0, 0, size, size);
}
Step 4 - Drawing the contours of the mask for debugging purposes
private void drawContours() {
    /* Draw the contour of the circle and rectangle used as masks. */
    shapeRenderer.setColor(Color.CYAN);
    shapeRenderer.circle(size / 2f, size / 2f, size / 2f);
    shapeRenderer.rect(size / 2f, 0, size / 2f, size / 2f);
}
Result
@Override
public void render() {
    ScreenUtils.clear(Color.BLACK);

    spriteBatch.begin();
    drawImages();
    spriteBatch.end();

    shapeRenderer.begin();
    drawContours();
    shapeRenderer.end();
}
6. Masking using Shaders (Textures)
This technique allows the mask to be any image or shape and takes alpha channel into account. This time we’ll be using the libGDX’s ShaderProgram class in conjunction with the Texture class.
Step 1 - Preparations
private final int size = 300;
private Texture texture;
private SpriteBatch spriteBatch1, spriteBatch2;
private ShapeRenderer shapeRenderer;

@Override
public void create() {
    /* We'll be using a pixmap to define the mask this time. */
    defineMask();

    /* Some regular textures to draw on the screen. */
    texture = new Texture(WEIRD_SHAPE_PATH);
    texture.setFilter(Linear, Linear);

    setupShader();

    /* An unmodified SpriteBatch to draw the original image as reference
     * we could also change the shader of spriteBatch1 back to the default. */
    spriteBatch2 = new SpriteBatch();

    /* Construct a simple ShapeRenderer to draw reference contours. */
    shapeRenderer = new ShapeRenderer();
    shapeRenderer.setAutoShapeType(true);
    Gdx.gl.glLineWidth(2);
}
Step 2 - Defining our mask
private void defineMask() {
    /* The fragment shader simply multiplies the fragment's usual alpha with
     * our mask alpha, since we only care about the alpha channel, the Alpha
     * Pixmap format is just what we need. */
    Pixmap pixmap = new Pixmap(size, size, Alpha);

    /* Pixmap blending can result in some funky looking lines when
     * drawing. You may need to disable it. */
    pixmap.setBlending(None);

    /* The default color of a newly created Pixmap has an alpha value of 0
     * play with different alpha values for different levels of transparency. */
    pixmap.setColor(0, 0, 0, 1);

    /* This setting will let us see some portions of the masked image. */
    pixmap.fillCircle(size / 2, size / 4, size / 4);
    pixmap.setColor(0, 0, 0, 0.25f);
    pixmap.fillRectangle(size / 4, size / 2, size / 2, size / 2);

    /* Create a Texture based on the pixmap.
     * IMPORTANT: How we create the texture doesn't matter, this technique
     * also allows, for example, to create it out of any supported format image */
    Texture pixmapTex = new Texture(pixmap);

    /* Bind the mask texture to TEXTURE<N> (TEXTURE1 for our purposes),
     * which also sets the currently active texture unit. */
    pixmapTex.bind(1);

    /* However SpriteBatch will auto-bind to the current active texture,
     * so we must now reset it to TEXTURE0 or else our mask will be
     * overwritten. */
    Gdx.gl.glActiveTexture(GL20.GL_TEXTURE0);
}
Step 3 - Setting up the shader
private void setupShader() {
    /* It's nicer to keep shader programs as text files in the assets
     * directory rather than dealing with horrid Java string formatting. */
    FileHandle vertexShader = Gdx.files.internal("shaders/shared/vertex.glsl");
    FileHandle fragmentShader = Gdx.files.internal("shaders/masking/fragment.glsl");

    /* Bonus: you can set `pedantic = false` while tinkering with your
     * shaders. This will stop it from crashing if you have unused variables
     * and so on. */
    ShaderProgram.pedantic = false;

    /* Construct our shader program. Spit out a log and quit if the shaders
     * fail to compile. */
    ShaderProgram shader = new ShaderProgram(vertexShader, fragmentShader);
    if (!shader.isCompiled()) {
        Gdx.app.log("Shader", shader.getLog());
        Gdx.app.exit();
    }

    /* Tell our shader that u_texture will be in the TEXTURE0 spot and
     * u_mask will be in the TEXTURE1 spot. We can set these now since
     * they'll never change; we don't have to send them every render frame. */
    shader.bind();
    shader.setUniformi("u_texture", 0);
    shader.setUniformi("u_mask", 1);

    /* Construct a simple SpriteBatch using our shader program. */
    spriteBatch1 = new SpriteBatch();
    spriteBatch1.setShader(shader);
}
The vertex.glsl shader file:
uniform mat4 u_projTrans;

attribute vec4 a_position;
attribute vec4 a_color;
attribute vec2 a_texCoord0;

varying vec4 v_color;
varying vec2 v_texCoord0;

void main()
{
    v_color = a_color;
    v_texCoord0 = a_texCoord0;
    gl_Position = u_projTrans * a_position;
}
The fragment.glsl shader file:
#ifdef GL_ES
precision mediump float;
#endif

uniform sampler2D u_texture;
uniform sampler2D u_mask;

varying vec4 v_color;
varying vec2 v_texCoord0;

void main()
{
    vec4 texColor = texture2D(u_texture, v_texCoord0);
    vec4 mask = texture2D(u_mask, v_texCoord0);
    texColor.a *= mask.a;
    gl_FragColor = v_color * texColor;
}
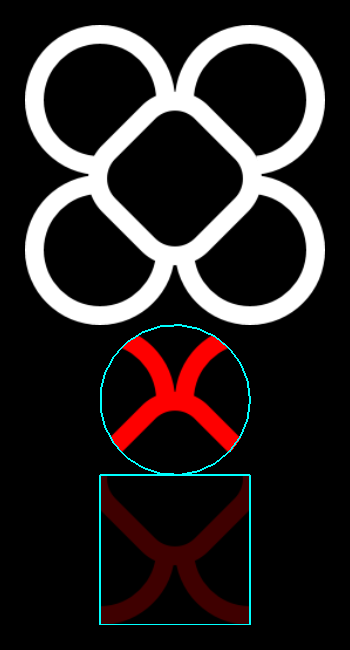
Step 4 - Drawing the contours of the mask for debugging purposes
private void drawContours() {
    /* Draw the contour of the masks. */
    shapeRenderer.setColor(Color.CYAN);
    shapeRenderer.rect(size / 4f, 0f, size / 2f, size / 2f);
    shapeRenderer.circle(size / 2f, size * 0.75f, size / 4f);
}
Result
@Override
public void render() {
    ScreenUtils.clear(Color.BLACK);

    /* Draw our masked image. */
    spriteBatch1.begin();
    spriteBatch1.setColor(Color.RED);
    spriteBatch1.draw(texture, 0, 0, size, size);
    spriteBatch1.end();

    /* Draw the original image unmasked for comparison. */
    spriteBatch2.begin();
    spriteBatch2.draw(texture, 0, size, size, size);
    spriteBatch2.end();

    shapeRenderer.begin();
    drawContours();
    shapeRenderer.end();
}
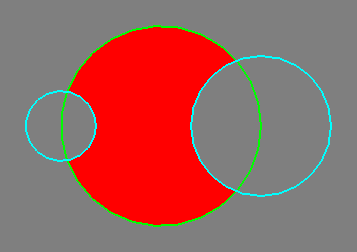
7. Masking using BlendFuncSeparate (Removal)
Ideal if you wanna use the mask to hide portions of the masked elements.
Step 1 - Preparations
private ShapeRenderer shapeRenderer;
private FrameBuffer frameBuffer;
private SpriteBatch spriteBatch;

@Override
public void create() {
    shapeRenderer = new ShapeRenderer();
    shapeRenderer.setAutoShapeType(true);
    Gdx.gl20.glLineWidth(2);

    frameBuffer = new FrameBuffer(Pixmap.Format.RGBA8888, Gdx.graphics.getWidth(), Gdx.graphics.getHeight(), false);

    spriteBatch = new SpriteBatch();
}
Step 2 - Drawing the masked elements and the mask elements
private void drawCircles() {
    shapeRenderer.set(ShapeType.Filled);

    /* An example circle, remember to flush before changing the blending function */
    shapeRenderer.setColor(Color.RED);
    shapeRenderer.circle(200, 200, 100);
    shapeRenderer.flush();

    /* We'll need blending enabled for the technique to work*/
    Gdx.gl.glEnable(GL20.GL_BLEND);

    /* With this blending function, wherever we draw pixels next
     * we will actually remove previously drawn pixels. */
    Gdx.gl.glBlendFuncSeparate(GL20.GL_ZERO, GL20.GL_ZERO, GL20.GL_ONE_MINUS_SRC_ALPHA, GL20.GL_ONE_MINUS_DST_ALPHA);
    shapeRenderer.circle(300, 200, 70);
    shapeRenderer.circle(100, 200, 35);
    shapeRenderer.flush();

    /* Restore defaults. */
    Gdx.gl.glDisable(GL20.GL_BLEND);

    /* The default blend function in case we need standard blending elsewhere.
     * Gdx.gl.glBlendFunc(GL20.GL_SRC_ALPHA, GL20.GL_ONE_MINUS_SRC_ALPHA); */
}
Step 3 - Drawing the contours for debugging purposes
private void drawContours() {
    shapeRenderer.set(ShapeType.Line);

    /* Contour of the masked circle */
    shapeRenderer.setColor(Color.GREEN);
    shapeRenderer.circle(200, 200, 100);

    /* Contour of the masks */
    shapeRenderer.setColor(Color.CYAN);
    shapeRenderer.circle(300, 200, 70);
    shapeRenderer.circle(100, 200, 35);
}
Result
@Override
public void render() {
    ScreenUtils.clear(Color.GRAY);

    frameBuffer.bind();
    shapeRenderer.begin();
    drawCircles();
    drawContours();
    shapeRenderer.end();
    frameBuffer.end();

    Texture texture = frameBuffer.getColorBufferTexture();
    Sprite sprite = new Sprite(texture);
    sprite.flip(false, true);

    spriteBatch.begin();
    sprite.draw(spriteBatch);
    spriteBatch.end();
}
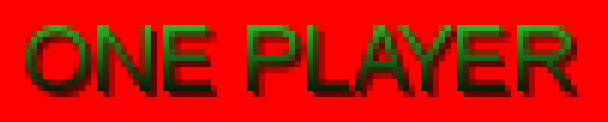
8. Masking using Blending Function (Tinting)
Ideal if you wanna use the mask to tint or texture portions of the masked elements.
Step 1 - Preparations
private ShapeRenderer shapeRenderer;
private SpriteBatch spriteBatch;
private BitmapFont menuItemFont;
private FrameBuffer frameBuffer;
private float textWidth, textHeight, textX, textY;

@Override
public void create() {
    shapeRenderer = new ShapeRenderer();
    shapeRenderer.setAutoShapeType(true);

    spriteBatch = new SpriteBatch();

    menuItemFont = new BitmapFont();
    menuItemFont.getData().setScale(6f);

    int screenWidth = Gdx.graphics.getWidth();
    int screenHeight = Gdx.graphics.getHeight();

    GlyphLayout glyphLayout = new GlyphLayout();
    glyphLayout.setText(menuItemFont, "ONE PLAYER");

    textWidth = glyphLayout.width;
    textHeight = glyphLayout.height;
    textX = screenWidth / 2f - textWidth / 2f;
    textY = screenHeight / 2f + textHeight / 2f;

    frameBuffer = new FrameBuffer(Pixmap.Format.RGBA8888, screenWidth, screenHeight, false);
}
Step 2 - Drawing the mask and masked elements
private void draw() {
    spriteBatch.begin();
    menuItemFont.draw(spriteBatch, "ONE PLAYER", textX, textY);
    spriteBatch.end();

    Gdx.gl.glEnable(GL20.GL_BLEND);

    Gdx.gl.glBlendFunc(GL20.GL_DST_COLOR, GL20.GL_ZERO);

    shapeRenderer.begin();
    shapeRenderer.set(ShapeType.Filled);
    shapeRenderer.rect(textX - 10, textY + 10, textWidth + 20, -(textHeight + 20),
            Color.LIME, Color.LIME, Color.BLACK, Color.BLACK);
    shapeRenderer.end();

    Gdx.gl.glDisable(GL20.GL_BLEND);
}
Result
@Override
public void render() {
    ScreenUtils.clear(Color.RED);

    frameBuffer.bind();
    draw();
    frameBuffer.end();

    Texture texture = frameBuffer.getColorBufferTexture();
    Sprite sprite = new Sprite(texture);
    sprite.flip(false, true);

    spriteBatch.begin();
    sprite.draw(spriteBatch);
    spriteBatch.end();
}