rendering super-smooth scalable bitmap fonts
Signed distance field rendering is a technique used in Team Fortress 2, and documented by Chris Green of Valve in the SIGGRAPH 2007 paper Improved Alpha-Tested Magnification for Vector Textures and Special Effects. It allows you to render bitmap fonts without jagged edges even at high magnifications. This article describes how to implement the technique in libgdx.
Introduction
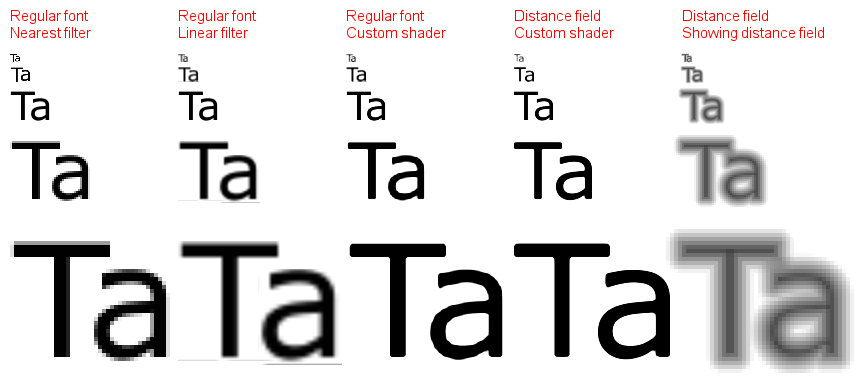
Traditional bitmap fonts work fine if the pixels in the font map 1:1 onto screen pixels. However, they look bad when rotated, and increasingly worse when scaled up. Either you end up seeing individual pixels, or you turn on linear interpolation and end up with a smudgy blur instead.
Using a distance field font lets you render text that remains crisp even under rotations and other arbitrary transforms, even blown up to a large magnification, without notable extra run-time cost. You can see the difference below:
The same technique can also be used to draw symbols, logos, anything. The major drawback is that it works only for monochrome images; it is not possible to use this technique for arbitrary color images.
There is an example of rendering in the libGDX source code. Check out com.badlogic.gdx.tests.BitmapFontDistanceFieldTest in the gdx-tests project. It was used to produce the above screenshot. There’s also com.badlogic.gdx.graphics.g2d.DistanceFieldFont.java class if you want to jump directly to usage.
How does it work?
The idea is pretty simple. Instead of providing a (possibly anti-aliased) black and white image of the font, we pre-process it to produce a signed distance field. The rightmost column in the screenshot above shows what our font image looks like after pre-processing.
The pre-processor takes a black and white image as input, with a black background and a white glyph. For each white pixel, it computes the distance to the closest black pixel, and vice versa. For black pixels, the distance for black pixels is then negated, and the result is normalized to the range 0-1. This gives us a smooth, continuous field, with 0.5 exactly on the edge of the original glyph, decreasing to 0.0 as we move farther away, and increasing to 1.0 when we move towards the inside.
We then set up alpha testing to output a pixel only when the alpha is greater than 0.5. With a texture that uses nearest-neighbour interpolation, this will look exactly the same as our input image. However, the distance field image is much better suited to linear interpolation than a traditional font image is: compare the third and fourth columns in the picture above.
Generating the font
This process is much the same as for regular bitmap fonts, but with different settings.
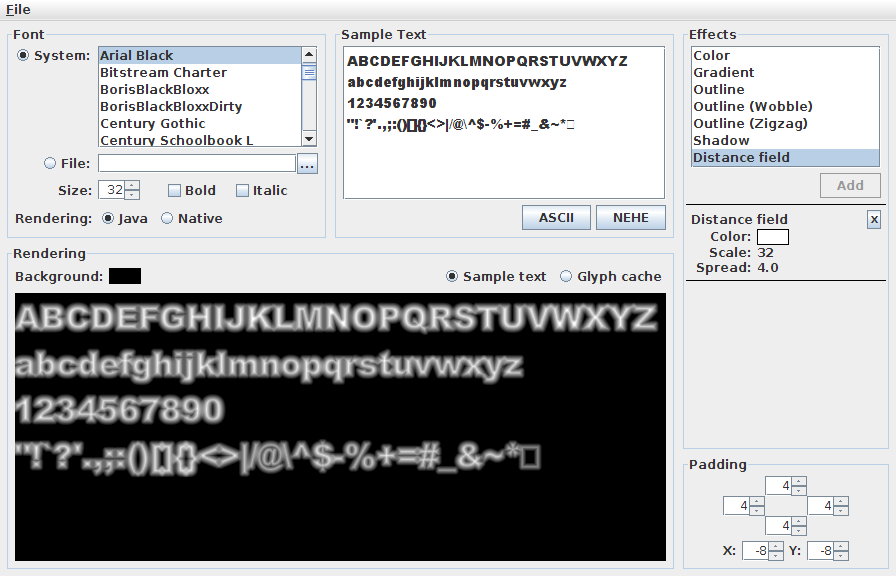
- Fire up Hiero and choose your font and attributes as normal.
- In the “Effects” list on the right, double-click “Distance field”. (If there is no filter called “Distance field”, your version of Hiero is too old. Try the nightly build as described on the Hiero page.)
- Remove the default “Color” effect by clicking the X.
- Set the color of the distance field if you like. It is best to leave this set to white, because you can change the color at rendering time.
- Set the “Spread” to a suitable value. It should be about half the width of the thickest lines in your font, in pixels. At most, there should be small regions of bright white; don’t lose too much contrast.
- In the bottom right corner, set the “Padding” on all four sides to be equal to the spread. You should see that your glyphs are no longer being clipped.
- Set the “X” and “Y” to minus twice the spread. If you used a spread of 4, you’d set -8 for both X and Y. This is necessary because the padding increases the spacing between glyphs at rendering time.
- Select the “Glyph cache” radio button and set the page size such that all glyphs fit on one page, with as little waste as possible. This makes loading easier.
- Set the “Scale” to something larger than 1. We save this step for last because the higher the scale, the slower the font generation gets. 32 is a good value. You should now have something like this:
- Save the font as usual to your assets directory.
Loading the font
There is no magic to loading the font into your game. You just need to make sure that you enable linear filtering on the texture:
Texture texture = new Texture(Gdx.files.internal("myfont.png"));
texture.setFilter(TextureFilter.Linear, TextureFilter.Linear);
To make your font look better when down-scaled (less than 1:1 size), you can also turn on mipmapping:
Texture texture = new Texture(Gdx.files.internal("myfont.png"), true); // true enables mipmaps
texture.setFilter(TextureFilter.MipMapLinearNearest, TextureFilter.Linear); // linear filtering in nearest mipmap image
Use either MipMapLinearNearest or the slower but smoother MipMapLinearLinear.
Then create the font:
BitmapFont font = new BitmapFont(Gdx.files.internal("myfont.fnt"), new TextureRegion(texture), false);
Note: Before LibGDX 1.6.0 (May 2015), if you’re replacing a “regular” font by a distance field font, be aware that the font metrics are not the same. In particular, the extra padding causes the baseline to shift downwards, so you’ll need to compensate by drawing your text higher. As of commit c976f463, padding should be compensated for automatically.
Rendering with a shader
I’ll assume that you are familiar with shaders in libgdx; if not, read the page on shaders.
There is nothing special about the vertex shader; we can just duplicate the one that SpriteBatch uses by default. Just take care to name the variables in the way that SpriteBatch expects:
uniform mat4 u_projTrans;

attribute vec4 a_position;
attribute vec2 a_texCoord0;
attribute vec4 a_color;

varying vec4 v_color;
varying vec2 v_texCoord;

void main() {
    gl_Position = u_projTrans * a_position;
    v_texCoord = a_texCoord0;
    v_color = a_color;
}
The secret sauce is in the fragment shader. But even here, there’s not much to it:
#ifdef GL_ES
precision mediump float;
#endif

uniform sampler2D u_texture;

varying vec4 v_color;
varying vec2 v_texCoord;

const float smoothing = 1.0/16.0;

void main() {
    float distance = texture2D(u_texture, v_texCoord).a;
    float alpha = smoothstep(0.5 - smoothing, 0.5 + smoothing, distance);
    gl_FragColor = vec4(v_color.rgb, v_color.a * alpha);
}
Assuming you’ve saved these to your assets directory as font.vert and font.frag, you can load the shader as usual:
ShaderProgram fontShader = new ShaderProgram(Gdx.files.internal("font.vert"), Gdx.files.internal("font.frag"));
if (!fontShader.isCompiled()) {
    Gdx.app.error("fontShader", "compilation failed:\n" + fontShader.getLog());
}
To render the font using this shader, assuming that you already have a SpriteBatch and are between a begin() and end() call, is really straightforward:
spriteBatch.setShader(fontShader);
font.draw(spriteBatch, "Hello smooth world!", 10, 10);
spriteBatch.setShader(null);
Customizing the shader
Remember that distance is a value between 0 and 1, with 0 being far away from the letter, 0.5 being right on the edge, and 1 being well inside it. The smoothstep function in the shader above is mapping values well below 0.5 to 0, and values well above 0.5 to 1, but gives a smooth transition around 0.5 to provide antialiasing. The softness of this transition is configured by the smoothing constant, which you should tweak to be correct for your font and scale.
The right smoothing value for crisp fonts is 0.25f / (spread * scale), where spread is the value you used when generating the font, and scale is the scale you’re drawing it at (how pixels in the distance field font are mapped to screen pixels). If the scale is not constant, you can pass it in via a uniform variable.
There are all sorts of additional tricks you can do based on the distance variable in the shader. Here are some possibilities. I haven’t tested any of these; if you find bugs, please update this wiki page!
Adding an outline
The idea is that we output a different color when distance is between outlineDistance and 0.5.
...
const float outlineDistance; // Between 0 and 0.5, 0 = thick outline, 0.5 = no outline
const vec4 outlineColor;
...
void main() {
    float distance = texture2D(u_texture, v_texCoord).a;
    float outlineFactor = smoothstep(0.5 - smoothing, 0.5 + smoothing, distance);
    vec4 color = mix(outlineColor, v_color, outlineFactor);
    float alpha = smoothstep(outlineDistance - smoothing, outlineDistance + smoothing, distance);
    gl_FragColor = vec4(color.rgb, color.a * alpha);
}
Adding a drop shadow
Here, we sample the texture a second time, slightly offset from the first. The second application gets a lot more smoothing applied to it, and is rendered “behind” the actual text.
...
const vec2 shadowOffset; // Between 0 and spread / textureSize
const float shadowSmoothing; // Between 0 and 0.5
const vec4 shadowColor;
...
void main() {
    float distance = texture2D(u_texture, v_texCoord).a;
    float alpha = smoothstep(0.5 - smoothing, 0.5 + smoothing, distance);
    vec4 text = vec4(v_color.rgb, v_color.a * alpha);

    float shadowDistance = texture2D(u_texture, v_texCoord - shadowOffset).a;
    float shadowAlpha = smoothstep(0.5 - shadowSmoothing, 0.5 + shadowSmoothing, shadowDistance);
    vec4 shadow = vec4(shadowColor.rgb, shadowColor.a * shadowAlpha);

    gl_FragColor = mix(shadow, text, text.a);
}
Using distance fields for arbitrary images
The generator used by Hiero can also be used as a stand-alone command line tool, to process pre-existing black and white images. Run it from an unzipped libGDX distribution directory as follows:
Windows:
java -cp gdx.jar;gdx-natives.jar;gdx-backend-lwjgl.jar;gdx-backend-lwjgl-natives.jar;extensions\gdx-tools\gdx-tools.jar com.badlogic.gdx.tools.distancefield.DistanceFieldGenerator
Linux:
java -cp gdx.jar:gdx-natives.jar:gdx-backend-lwjgl.jar:gdx-backend-lwjgl-natives.jar:extensions/gdx-tools/gdx-tools.jar com.badlogic.gdx.tools.distancefield.DistanceFieldGenerator
This will print usage instructions:
Generates a distance field image from a black and white input image.
The distance field image contains a solid color and stores the distance
in the alpha channel.

The output file format is inferred from the file name.

Command line arguments: INFILE OUTFILE [OPTION...]

Possible options:
  --color rrggbb    color of output image (default: ffffff)
  --downscale n     downscale by factor of n (default: 1)
  --spread n        edge scan distance (default: 1)
The options are similar to those in Hiero described above, except that spread is defined in terms of pixels on the input image, not the downscaled output image. To get the same result, multiply it by downscale. Also note that the defaults are probably not very helpful, and you’ll want to specify both --downscale and --spread:
java -cp extensions/gdx-tools.jar:gdx.jar com.badlogic.gdx.tools.distancefield.DistanceFieldGenerator
     --downscale 32
     --spread 128
     logo.png logo-df.png