This article introduces NinePatch images, how they can be created and how they are used in a libGDX context.
Before you start
This guide was intended for the old scene2d and the skinpacker (the versions before 0.9.6). If you are running of the nightlies, this guide can give some hints, but won’t work as a step-by-step guide. The main differences are that skinpacker and texturepacker has been unified in the texturepacker2 and that skins gets loaded in a different way.
Introduction
A NinePatch image is an image with defined “stretchable” areas. With this property one can create images that repeats either to very small regions, or scale to very big regions. Since the areas are pre-defined, the image won’t look stretched (given that it has been created with scaling in mind). The corresponding NinePatch class in libGDX is located here (code).
A NinePatch is used in various of the Scene2d components of Libgdx, including:
- Buttons
- ScrollPanes
- Textfields
In libGDX there are several ways to load resources, which also counts for NinePatches. When manually creating and instantiating a ninepatch, we are specifying the patch regions in code. When loading a NinePatch using Skins (and the SkinPacker to create them) the process is a bit different. This will also be covered on this page.
Creating and instantiating a NinePatch manually
This is a short introduction to instantiate a NinePatch image manually in code. It’s basically to create an image, figure out what regions to stretch and note down the pixels of those regions.
Create your scalable image
Keep in mind that some area of your image needs to hold the content (text, other images etc), and can therefore not contain any “special features” (since this area will be scaled). In this case I’ll create a “button”. My art skills are non existent, so please bear with me on this example.

As one may notice, this “button” is fairly round. One of the wonders with NinePatch is that it will wrap around the content we give it, thus expand in the horizontal direction when we feed it some text. The corners of this button are plain translucent pixels. Notice that we do not define the stretchable areas on the image, since we will do this in code instead.
Instantiate the NinePatch
The simplest form of instantiating a new NinePatch:
NinePatch patch = new NinePatch(new Texture(Gdx.files.internal("knob.png")), 12, 12, 12, 12);
The four integer arguments are specifying what regions (in pixels) we will allow the image to stretch in.
The true power of NinePatch reveals itself when applied to Scene2D elements. Below is an example of instantiation a button, with our newly created image.
// Create a new TextButtonStyle
TextButtonStyle style = new TextButtonStyle(patch, patch, patch, 0, 0, 0, 0, new BitmapFont(), new Color(0.3f, 0.2f, 0.8f, 1f), new Color(0, 0, 0, 1f), new Color(0, 0, 0, 1f));
// Instantiate the Button itself.
TextButton button = new TextButton("hello world", style);
The result of adding this TextButton to a stage is illustrated below:
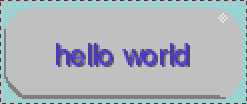
Our round image has now scaled with the content length (the text). The button use the standard BitmapFont and some awful colours.
Limitations when instantiating in code
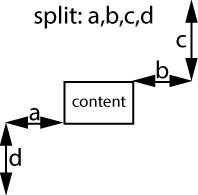
Limitations with instantiating a NinePatch directly (using Libgdx) is that your fixed regions all will be the same square. Below I have attached an image illustrating what the four integer arguments actually define in the NinePatch. The gray area not overlapped by cyan is the scaleable area.

Creating and instantiating a NinePatch using SkinPacker
Note: For the SkinPacker to properly recognize/parse NinePatch images the image needs to be postfixed with .9.png (if .png is your file ending).
The NinePatch image needs to have some special properties within the image itself, to be able to act as a NinePatch. These properties are added by padding the image with a 1 pixel border. The steps to create a NinePatch are described below.
Define stretchable areas
Now we need to alter the image, and add black borders where we want to allow the image to stretch. This can be done in any image editor. But there are editors to ease the process.
GitHub AndroidAssetStudio generator
This is my personal favorite. No need for anything, just go to the site, specify your image, it automatically guestimates it (and gets it right in my experience) and hit the download button, it’ll even put it in a nice zip for you for android (if you’re not on android you can ignore it and go for the smallest one, since it is a ninepatch and scaleable as high as you want) https://romannurik.github.io/AndroidAssetStudio/nine-patches.html
WebLaF ninepatch-editor
A more up-to-date and functional tool than the below Android SDK one, it was actually created because of the shortcomings of the draw9patch tool, can be found in the weblaf project. Scroll down and find the ninepatch-editor tool standalone jar release available for download.
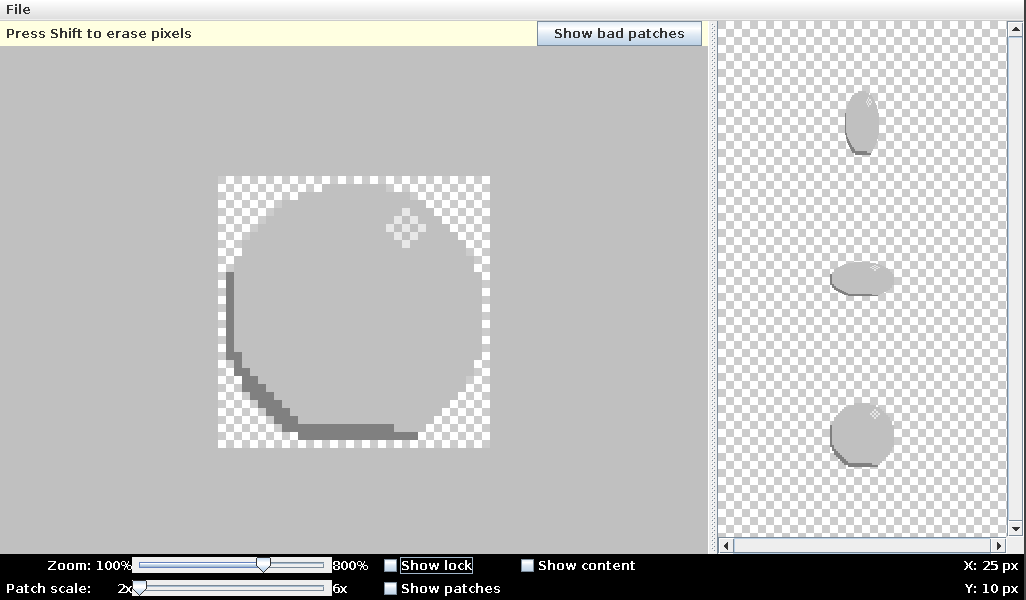
Android SDK draw9patch
The Android SDK contains an excellent tool for exactly this purpose,
and is located in _android-sdk/tools/draw9patch_. This tool provides a
pre-view of the scaled image. Below is just the image loaded into the
draw9patch tool. Notice the “pre-view” to the left, and how the image
does not scale well at all.
In the following picture, I have defined what area the content will be placed in (in other words, what will be scaled), and what areas I don’t want to scale. Again, this is achieved by padding with a 1 pixel border in the image. You see that the tool previews the content (pink area), and that the previews scales much better (in the right side of the screenshot).
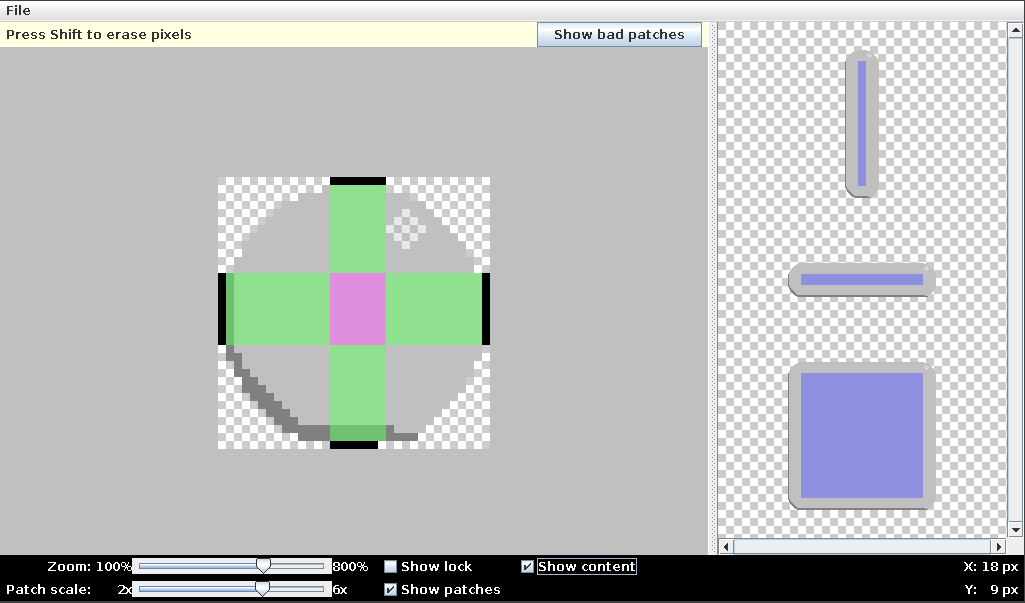
Now save the image as image.9.png. This can’t be underlined enough, since libGDX won’t recognize the file as a NinePatch otherwise. Below is the finished image in all its NinePatch glamour, and ready to be used in code.

Defining a NinePatch programmatically
See this NinePatch constructor.
Pack the image using SkinPacker
This step should be covered in other areas of this Wiki (preferable a node about the SkinPacker). Since the image is postfixed with .9.png its areas will be analyzed by looking at the 1 pixel padded outer region (as we defined in the previous step).
When this is the only picture from the export-folder run in the SkinPacker the result will be:
"resources": {
        "com.badlogic.gdx.graphics.g2d.NinePatch": {
                "knob": [
                        { "x": 2, "y": 2, "width": 13, "height": 11 },
                        { "x": 15, "y": 2, "width": 7, "height": 11 },
                        { "x": 22, "y": 2, "width": 12, "height": 11 },
                        { "x": 2, "y": 13, "width": 13, "height": 9 },
                        { "x": 15, "y": 13, "width": 7, "height": 9 },
                        { "x": 22, "y": 13, "width": 12, "height": 9 },
                        { "x": 2, "y": 22, "width": 13, "height": 12 },
                        { "x": 15, "y": 22, "width": 7, "height": 12 },
                        { "x": 22, "y": 22, "width": 12, "height": 12 }
                ]
        }
}
We see that the packer actually defined nine patches (somebody should be mind blown by now!). One huge advantage with this is that we are no longer constrained to the 1 square for each region (as opposed to instantiate Ninepatches manually). We can now define more fine-grained nine patches. In addition to this, its much easier to just alter an image and run it through the packer, and it will define regions.