LibGDX provides its own 3D format out of the box called G3D (g3dj and g3db files), this article describes steps from Blender to your game using this format. OBJ format is partially supported and not recommended for production. Alternatively, you can use glTF format via third party library gdx-gltf which also provides advanced features like PBR rendering.
Note: while this page uses Blender for practical examples, most of it applies to other modeling applications as well.
Blender is an open-source modeling application you can use to create 3D models, scenes and animations. You can get Blender at blender.org. If you are new to creating 3D models using Blender, you can checkout the blender tutorials. This page provides practical tips on preparing and converting your Blender model for use in libGDX.
Blender considerations
As Blender is a multi-purpose tool, there are certain pitfalls you can stumble into that will make your model ill suited for game development. One such mistake is using the Rigify plugin to animate your model: it will add so much stuff that your model will grow in size to at the very least 3mb (per animated model), and possibly even more, so use that with great care.
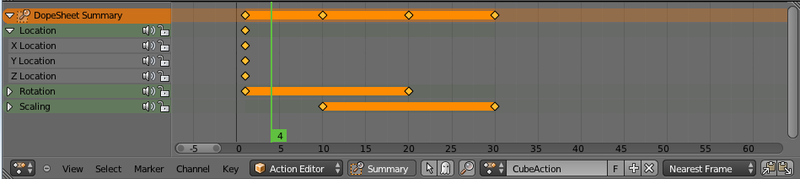
Another size consideration may be (depending on type and amount of animations) to set your key frame interpolation to linear (from the default bezier interpolation). This may drastically improve your g3db file size (but it may also change how your animations look, so check before you hit save). To change keyframe interpolation in blender, switch to the animation perspective, select all your keyframe nodes with the A key in the Dope Sheet, press T and select “Linear”.
Blender Animation
Make sure to use the Action Editor for you animation of your models. The name you provide for the animation dropsheet in blender is the animation ID you can use in your code. In the below snapshot, CubeAction would be the name. Don’t forget to hit that little F to ensure the action is saved!
Exporting to FBX and converting to G3DB
Note: see this project here) which converts directly from .blend files. *For Older Blender versions <2.8, check this project: here.
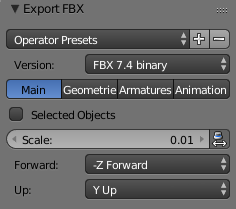
The default (preferred) method is to export to FBX. Make sure you select all and only those options (e.g. nodes and animations) you want to actually include. Don’t include your camera, lights, etc. Next download the latest version of fbx-conv and convert the FBX file to G3DB. You’ll need to flip texture coordinates by using the -f commandline option.
fbx-conv -f file.fbx
Optionally, you may also convert your file to the G3DJ format, which is a JSON format which is readily viewable with a simple text editor. fbx-conv -f -o G3DJ file.fbx Please note that G3DJ will take longer to load when you run your application, as it is not a binary format.
Please note that there is a known limitation to using the FBX export in Blender. The current exporter only supports texface textures (i.e. textures assigned to an UV map).
Also note that Blender exports at 1 unit = 1 meter, while libGDX imports at a scale of 1 unit = 1 cm, making imported models 100x bigger. Change the export options from the default 1.00 to 0.01 to fix.
Setting the coordinate system (up-axis)
The coordinate system Blender uses (z-up) is different compared to the most common system used for games (y-up). The Blender FBX exporter contains the option to change the coordinate system to y-up (which might be even the default in the FBX exporter), do not use this option, instead set it to Blender’s default (z-up).
Fbx-conv will compensate the coordinate system by rotating the model (to y-up). However it will only be able to do this, if the fbx file itself contains the correct information. The Blender FBX exporter option will not modify the model, instead it will simply act like its y-up (causing fbx-conv unable to compensate).
When fbx-conv needs to compensate the coordinate system, it will rotate all root nodes of the model 90 degrees along the X-axis. It will also modify any animations accordingly. The geometry (vertices) itself however, remains unchanged.
However, if you want to use z-up in your application, then you can set Blender’s FBX exporter coordinate system option to y-up. This will cause fbx-conv not to rotate your model and animations, so it will be z-up.
Troubleshooting missing textures
If your faces are not drawn, please check try disabling back face culling. Your faces may be missing because they are facing away from the camera. DefaultShader.defaultCullFace = 0;
Also, it is quite common that the materials from Blender export with opacity set to Zero. If you notice your model is not being rendered. Go to the Material in Blender, and below “Transparency” set its Alpha to the desired one (usually 1, for full opacity).
Troubleshooting black textures
Please ensure you limit the size of your texture files to POT (power of two dimensions) which are square shaped meaning of equal width and height (e.g. 32x32, 64x64 etc). A maximum recommended size would be 1024x1024 for widespread support, however larger sizes may still render, depending on device. Often non-POT textures render correctly on a desktop, but not on mobiles. This is a limitation specific to the GPU being used, and non-POT support will vary from device to device.
Additionally test that your lighting/color is configured in a way which will illuminate your model instance. A good test is to pass a null environment pointer to your Model Batch, which will disable lighting effects.
If you have used Blender’s FBX export script, please ensure your textures were assigned to a UV map, as the export script only supports texface textures, go to edit mode, in UV/Texture editor select the texture/image that you want to export with the object.
RrSs warning
When using the Blender FBX exporter, you might receive a RrSs warning when converting the FBX file. This is due to the Blender FBX exporter wrongfully exporting the transformations. The fbx-conv utility will correct this and you can safely ignore the warning.
Maximum vertices
A model (g3dj or g3db file) can contain multiple meshes. These meshes are indexed. The indices used by libGDX are short values. Java’s maximum short value is 32,767. In other words: you practically can’t use more than 32767 vertices within a single mesh. Therefore you should make sure that your meshes never exceeds this limitation.
By default, fbx-conv warns you when you try to convert a mesh that contains more than 32767 indices. While this doesn’t have to mean that it will also result in more than 32767 vertices, it is a good indication that your mesh it is too “high-poly” and might cause issues. In this case you should consider lowering the polygon count or splitting the mesh into multiple parts.
If your model contains multiple similar meshes with less than 32767 vertices, then fbx-conv will try to combine these into a single mesh. When it combines meshes it will never exceed the maximum number of vertices of 32767. You can change this maximum using the -m command line option.
Warning: increasing the maximum number of vertices used by fbx-conv will not increase java’s maximum short value.
fbx-conv will never split your mesh, unless your mesh is skinned and exceeds the maximum number amount of bones specified. Simply because it doesn’t have enough information to do so.
Note that in contrast to java, both fbx-conv and opengl support
unsignedindices. Therefore you might not notice issues between 32767 and 65535 vertices in some cases and devices. You should not rely on this though.
Using the Model Preview Utility
There is a model preview utility at https://github.com/ASneakyFox/libgdx-fbxconv-gui which you can use to preview your models. Download a precompiled release from the releases section.

Loading a G3DJ file into libGDX and instantiating it
The simplest way to load a G3DJ file into libGDX is the following:
Model model = new G3dModelLoader(new JsonReader()).loadModel(Gdx.files.internal(modelFileName));
This will import the G3DJ file. To actually create a run-time instance of it, we can use a ModelBuilder in combination with a ModelBatch:
ModelBuilder modelBuilder = new ModelBuilder();
Model model = new G3dModelLoader(new JsonReader()).loadModel(Gdx.files.internal(modelFileName));
ModelInstance instance = new ModelInstance(model);
Loading and rendering a G3DJ file example
import com.badlogic.gdx.ApplicationListener;
import com.badlogic.gdx.Gdx;
import com.badlogic.gdx.graphics.Color;
import com.badlogic.gdx.graphics.GL20;
import com.badlogic.gdx.graphics.PerspectiveCamera;
import com.badlogic.gdx.graphics.VertexAttributes.Usage;
import com.badlogic.gdx.graphics.g3d.Environment;
import com.badlogic.gdx.graphics.g3d.Model;
import com.badlogic.gdx.graphics.g3d.ModelBatch;
import com.badlogic.gdx.graphics.g3d.ModelInstance;
import com.badlogic.gdx.graphics.g3d.attributes.ColorAttribute;
import com.badlogic.gdx.graphics.g3d.environment.DirectionalLight;
import com.badlogic.gdx.graphics.g3d.Material;
import com.badlogic.gdx.graphics.g3d.loader.G3dModelLoader;
import com.badlogic.gdx.graphics.g3d.utils.CameraInputController;
import com.badlogic.gdx.graphics.g3d.utils.ModelBuilder;
import com.badlogic.gdx.utils.JsonReader;

/**
 * Example program that imports "myModel.g3dj" from the assets folder and renders it onto the screen.
 */
public class ImportG3DJ implements ApplicationListener {
    private Environment environment;
    private PerspectiveCamera camera;
    private CameraInputController cameraController;
    private ModelBatch modelBatch;
    private Model model;
    private ModelInstance instance;

    @Override
    public void create() {
        // Create an environment so we have some lighting
        environment = new Environment();
        environment.set(new ColorAttribute(ColorAttribute.AmbientLight, 0.4f, 0.4f, 0.4f, 1f));
        environment.add(new DirectionalLight().set(0.8f, 0.8f, 0.8f, -1f, -0.8f, -0.2f));

        modelBatch = new ModelBatch();

        // Create a perspective camera with some sensible defaults
        camera = new PerspectiveCamera(67, Gdx.graphics.getWidth(), Gdx.graphics.getHeight());
        camera.position.set(10f, 10f, 10f);
        camera.lookAt(0, 0, 0);
        camera.near = 1f;
        camera.far = 300f;
        camera.update();

        // Import and instantiate our model (called "myModel.g3dj")
        ModelBuilder modelBuilder = new ModelBuilder();
        model = new G3dModelLoader(new JsonReader()).loadModel(Gdx.files.internal("myModel.g3dj"));
        instance = new ModelInstance(model);

        cameraController = new CameraInputController(camera);
        Gdx.input.setInputProcessor(cameraController);
    }

    @Override
    public void render() {
        cameraController.update();

        // Clear the stuff that is left over from the previous render cycle
        Gdx.gl.glViewport(0, 0, Gdx.graphics.getWidth(), Gdx.graphics.getHeight());
        Gdx.gl.glClear(GL20.GL_COLOR_BUFFER_BIT | GL20.GL_DEPTH_BUFFER_BIT);

        // Let our ModelBatch take care of efficient rendering of our ModelInstance
        modelBatch.begin(camera);
        modelBatch.render(instance, environment);
        modelBatch.end();
    }

    @Override
    public void dispose() {
        modelBatch.dispose();
        model.dispose();
    }

    @Override
    public void resize(int width, int height) { }

    @Override
    public void pause() { }

    @Override
    public void resume() { }
}