Community Showcase: colorful-gdx
Tommy Ettinger
Hey everybody! As announced a few months ago, we want to give creators of interesting community projects the opportunity to present their exciting libraries or tools on the official blog. In this Community Showcase, Tommy Ettinger is going to present his colorful-gdx library!
If you are interested in other cool community projects, be sure to check out the libGDX Awesome List as well. To participate in future showcases, take a look here.
colorful-gdx
What does it do?
With colorful-gdx, you can tint Sprites and other images with colors in different color spaces than what libGDX offers by default. Most importantly, this means you can use a batch color to lighten as well as darken an image, but there are many other features that come along with this. There’s a really wide range of operations you can do to blend or mix multiple colors (without creating temporary objects), edit properties of a color, and describe colors with a simple String syntax, if you want.
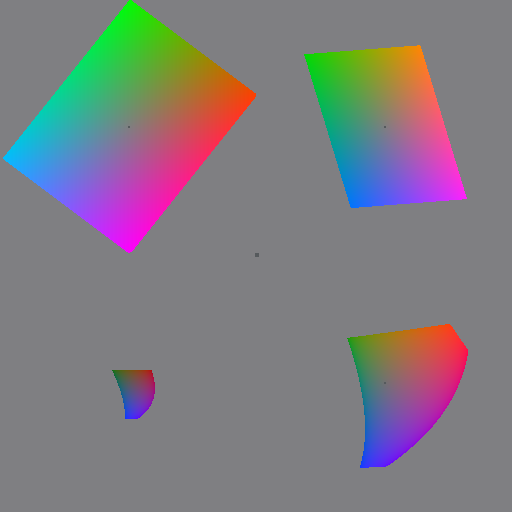
It doesn’t feel right to start a showcase for a very visual library without some eye candy, so here’s a visualization of different color spaces and their different shapes. It’s here because it looks cool and was made with this library; in practice you don’t need to know about this.
How does it work?
There’s a few ways you can use colorful-gdx. Technically, the repo is split into two subprojects, but if you’re working
with libGDX, you almost always want colorful, which uses libGDX for its Color, Batch, ShaderProgram, and other
classes. I’ll skip over installation details; the repo covers the Gradle dependency, or you could use gdx-liftoff’s
third-party extensions to get a recent version of colorful.
Your first choice is, “What color space should I use?” To answer this, you need to know what a color space is. You
already know at least one, RGBA – Color in libGDX uses it, as does almost everything on a computer screen. The other
options are less widely-known, and some are mostly in colorful-gdx for historical reasons. Generally, the choice is
between rgb and oklab.
With RGB, you have 3 channels, red/green/blue, plus alpha, and you can make a color lighter by raising the RGB channels or darker by lowering those channels. You can easily make a color more red by raising the red channel, and the same with green or blue. What if you want to make a color more orange? This is more of a challenge, and typically requires raising red and lowering blue, which can change lightness.
A solution for that type of issue lies in Oklab, a newer color space by Björn Ottosson. Oklab also has 3 channels, but they are L, A, and B (plus alpha, which is the same as before). L is lightness, and you can change the lightness of a color smoothly just by increasing or decreasing L. A and B are what are called “chromatic axes,” and in our usage they range from 0.0 to 1.0. When A is near 0.0, the color is going to be close to green; when it is near 1.0, the color is going to be close to red. When B is near 0.0, the color is going to be close to blue; when it is near 1.0, the color is going to be close to yellow. When both A and B are close to 0.5, the color is likely to be either grayish or actually grayscale. As L gets closer to 0.0 or 1.0, the span of A and B shrinks, and all colors that are nearly black or nearly white have A and B that are close to 0.5 (meaning they’re close to grayscale colors like black and white). If you want to keep the lightness of a color constant while making it more orange, you would do so by raising both A (more red) and B (more yellow), and leaving L alone.
Your choice between these two color spaces (or others, if you really want) mostly boils down to whether you want to edit colors based on their lightness, saturation, and other qualities as single numbers (which makes Oklab an excellent choice), or whether you just want a simple and compatible way to make a sprite extra-bright, extra-dark, extra-red/green/blue, etc. and don’t want to deal with these blasted newfangled color contraptions (which is why I provide the RGB color space).
Once you have an idea of what you want, you’d either make a SpriteBatch with a different ShaderProgram drawn from
colorful’s Shaders.java, or you’d skip that and just use the more-powerful but less-compatible ColorfulBatch for
your chosen color space. Either way, you gain the ability to add to color channels as well as subtract, which lets you
brighten and darken sprites by setting the batch color.
That’s all?
Yes, almost all the library winds up as a glorified way to set and interpret the batch color. Also, no, there are lots
of ways to get the batch color just right, or blend across frames, or analyze colors, or edit colors in different ways,
and so on and so forth. ColorfulBatch in particular adds extra options because it effectively has two batch colors –
one is called the “tweak,” and multiplies a channel, while the other is the normal batch color, which is added after the
tweak is applied. There’s a potentially-interesting feature here, too – one of the components of the tweak allows
configuring contrast, by making mid-range values either push even closer to the middle of the range, or pull even
further apart to make somewhat-similar colors appear different in lightness.
There are relatively large predefined palettes here. They store the colors as float (one float per color, which is
also called a “packed float color”), and those can be set in a SpriteBatch or ColorfulBatch using the
setPackedFloat() method. You can also edit colors with your chosen color space’s ColorTools class, or the shared
FloatColors class. This last one handles mixing colors, which is a feature you don’t want to miss! You can also mix
colors in the SimplePalette class by describing one or more colors from that palette in a String, along with
adjustments like “light” or “richest” that change the resulting float. This uses Strings like “darker dull blue gray
violet” to describe a grayish blue-purple.
You can preview the descriptions here; press the square
bracket keys to change modes from RGB to Oklab or a comparison.
There’s a lot of tricks you can uncover in colorful-gdx. Many effects are possible by doing things like reducing the range of lightness, or colorful-ness, and then applying a change. Other effects can be cycling hues (always a fun psychedelic effect), raising and lowering lightness to correspond to time of day in a game, using Oklab for smooth blends and then converting back to RGBA, and various other useful tools.
Here’s an example of such a nice trick. ColorfulBatch is a decent option for RGB, but it’s a great option for Oklab.
Because the tweak in Oklab works differently from the tweak in RGB, you can multiply by a small value for both A and B
to make the color grayish, or a high value to make the color especially vivid. RGB doesn’t have an option like this
other than using a low tweak value for R, G, and B, then moving the channels where you want them with the additive
color. That works by reducing the color to essentially black or close to it, then adding a color of your choice. Oklab
only reduces the color to grayish, keeping the lightness, so you can add values to L, A, and B that push the color to a
more-whatever-hue direction while maintaining or changing lightness as you want and possibly some original A and B.
If you’re worried about performance, this is not going to hurt anything. Using floats for colors avoids creating excessive garbage objects, and the shaders that handle color conversions are simple (for a GPU to execute) and branchless. If you’re going back and forth between a shader from colorful-gdx (or a ColorfulBatch) and some other shader, there will be a performance penalty based on the number of shader changes per frame, but 3D graphics in libGDX involves frequent shader changes, and those work just fine.
How do I use it?
Setup
For instructions on importing colorful into your project, see here. Version 0.6.0 just released and may be a little rough in places, but it includes several fixes to 0.5.1, so you’ll probably want the latest version. You can ignore colorful-pure unless you want to manipulate colors server-side.
If you don’t want to use a ColorfulBatch, you’ll want to take a SpriteBatch (which you probably already have used)
and set its shader to one from Shaders.
For RGB, this could look like:
SpriteBatch batch = batch = new SpriteBatch(1000, Shaders.makeRGBAShader());
Or, you could make the shader yourself, which is the only way for most of the shaders:
SpriteBatch batch = new SpriteBatch();
ShaderProgram shader = new ShaderProgram(vertexShader, fragmentShaderRGBA);
if(!shader.isCompiled())
    throw new GdxRuntimeException("Couldn't compile shader: " + shader.getLog());
batch.setShader(shader);
For Oklab, the second of those options is the only option if you aren’t using ColorfulBatch:
SpriteBatch batch = new SpriteBatch();
ShaderProgram shader = new ShaderProgram(vertexShader, fragmentShaderOklab);
if(!shader.isCompiled())
    throw new GdxRuntimeException("Couldn't compile shader: " + shader.getLog());
batch.setShader(shader);
If you are using ColorfulBatch, then usage looks like a normal SpriteBatch for now:
// Note, there are multiple ColorfulBatch classes in different packages.
// You use the com.github.tommyettinger.colorful.rgb package for RGB.
// You use the com.github.tommyettinger.colorful.oklab package for Oklab.
ColorfulBatch batch = new ColorfulBatch();
Tinting
Once you have your Batch, you can set a color on it right away with setPackedColor(float). As mentioned earlier,
colorful-gdx almost always stores colors as “packed” floats in colorful-gdx, and many are predefined in Palette and/or
SimplePalette in your color space’s package. There’s no need to use the specific colors in Palette and SimplePalette
in your game, and to be honest, some names in Palette are pretty bad. Give me a break, I had to name 256 of them!
SimplePalette has simpler names, as one might expect, all of them one word. You can browse the colors on colorful-gdx’s
(bare-bones) web pages:
- Palette, by name, Oklab
- Palette, by hue, Oklab
- Palette, by lightness, Oklab
- Palette, by name, RGB
- Palette, by hue, RGB
- Palette, by lightness, RGB
- SimplePalette, by name, Oklab
- SimplePalette, by hue, Oklab
- SimplePalette, by lightness, Oklab
- SimplePalette, by name, RGB
- SimplePalette, by hue, RGB
- SimplePalette, by lightness, RGB
The Oklab pages show the L, A, and B channel values for each color, while the RGB pages already have their
channels displayed in the RGBA8888 hex code column, and don’t repeat that info. Both show Hue and Saturation as
columns, but RGB also shows Lightness, while Oklab already showed that in its L column. Alternatively, you can do
what I do: look at the pretty colors, then copy a name when I’ve found one I like (I really like the “by hue” pages
for this).
Tinting with one of these predefined colors is easy:
batch.setPackedColor(Palette.DEEP_PURPLE);
This sets the tint to a very dark, bold purple, which darkens the shown Textures and makes them much more purple in hue.
If you didn’t specify a tint, that’s the same as using the neutral color
for your color space, which is Palette.GRAY for both the rgb and oklab color spaces. The neutral color causes no
change to the original colors in Textures you draw. In libGDX normally, the neutral color is white. Like in a normal
libGDX SpriteBatch, if you use a darker color than the neutral color, then the shown Textures get darker. Unlike in a
normal libGDX SpriteBatch, there are colors that are lighter than the neutral color – there are colors like
Palette.LIGHT_GRAY here, but nothing can be lighter than white. If you set the batch color to a lighter color, then
the shown textures will be lighter. There’s a scale here of grayscale colors (the colors in the “Palette, by hue” pages
above have them between Black and White), and all grayscale colors don’t affect the hue or saturation of Textures. This
is a key detail; colors that aren’t exactly grayscale, but are still grayish, will have less effect on hue and
saturation than very saturated, vivid colors. Using vibrant colors will mean very strong, possibly-overpowering tints,
and all levels of saturation can be useful for something. If you want to take an already-saturated Texture and
desaturate it, then you need something more than what SpriteBatch can provide; it will take ColorfulBatch and one whole
extra line of code. It is time to master… the twerk. I mean, tweak.
It’s an easy typo!
Tweaking
Here, things get more advanced; the rabbit hole goes deeper, and your colorful talents become far more powerful. It is true that setting the tweak on a ColorfulBatch is just one line:
colorfulBatch.setTweak(0.5f, 0.1f, 0.1f, 0.65f);
In an Oklab ColorfulBatch, this has the effect of making colors much less saturated (but not fully black-and-white), and
slightly increasing the lightness contrast between mid-lightness colors. If you ran that with an RGB ColorfulBatch…
well, the contrast would still increase, but blue and green would be mostly removed, making an image in shades of red.
You may want to avoid using the RGB ColorfulBatch tweak heavily, or only use it for its contrast (the last parameter).
In both RGB and Oklab, 0.5 is the neutral value for all tweak channels. This is different from the neutral color, which
is either (0.5f, 0.5f, 0.5f, 1f) for RGB or (0.63f, 0.5f, 0.5f, 1f) for Oklab (both are Palette.GRAY). The tweak
channels are a little different from the color channels. Instead of red, green, blue, alpha or L, A, B, alpha,
alpha is replaced with contrast, and instead of the other channels (RGB or LAB) adding to the Texture color, they
are multiplied. Because RGB and Oklab are pretty different in several areas, I’ll go over them one at a time, but since
contrast is the same for both, that comes first.
Contrast
In tweaks, you don’t really need extra changes to alpha, so the fourth parameter to a tweak value sets its contrast. The
contrast is neutral at 0.5, sharpens lightness contrast above 0.5, and fades away lightness contrast below 0.5. Fading
isn’t especially obvious, but sharpening can be a nice way to highlight specific elements. Because the neutral value for
tweaks is different from the neutral value for colors, ColorfulBatch defines the constant TWEAK_RESET for the
tweak’s neutral value. If you used a color for a tweak value, you’d see maximum contrast, because colors have 1.0 alpha
and that would become the starkest contrast if used in the tweak.
RGB
Using a value larger than 0.5 for one of a tweak’s RGB channels (let’s call that value tweak_channel) will magnify
that channel, effectively multiplying the channel in the texture by 2f * tweak_channel. Using a value smaller than 0.5
for one of a tweak’s RGB channels does the same thing, but because 2f * tweak_channel is less than 1, it will shrink
that channel, bringing all values in the Texture closer to 0 in that channel. You usually need to make use of the tweak
and color together in an RGB ColorfulBatch if you use the tweak at all. For instance, you can bring all colors closer to
medium-lightness by using a tweak of (0.3f, 0.3f, 0.3f, 0.5f) and a color of (0.7f, 0.7f, 0.7f, 1f). In steps, the
tweak first makes the RGB channels shrink in range from 0 through 1 to 0 through 0.6, because the tweak channels are
multiplied by 2 and then by the Texture colors. Then, the color is added in; because 0.7f is 0.2f more than the
neutral value for RGB, this adds 0.2f to the RGB channels. This takes the range from 0 through 0.6, where we left off,
to 0.2 through 0.8. This eliminates pure black and pure white, squishing all colors into a middle-lightness area.
Oklab
Oklab is a little different, and at this point, a visual aid is in order.

This animation shows the Oklab “gamut,” or the range of colors that can be correctly represented without clipping. The first frame is at 0 lightness, and is a single point of black (that doesn’t render). As the animation goes on, the lightness goes up, and you can start to see that while the very center is still grayish, the edges are more colorful. As the animation ends, lightness approaches 1 (white), and all the colors are forced closer to grayscale again. The x axis is the A channel, and the y axis is the B channel. If you start in the center and go to the right, you get more of a red color. If you instead go to the left, more green (well, cyan). If you go up, more yellow, and if you go down, more blue. When you use the tweak in Oklab, the tweak can still magnify or shrink A and B, but it does so relative to the center (grayscale), rather than black like in RGB. This is what makes Oklab’s tweak more useful; not only is lightness simple to adjust with just one channel (L), colorful-ness is simple to adjust by using the same change for the A and B channels. Adjusting L isn’t centered like A and B are; if you increase L on the tweak, it will make lightness range higher but no lower, and if you decrease it, the lightest colors become unavailable. The color can be useful with any kind of reduced range, moving L so a range like 0.0 through 0.4 is raised up to 0.3 to 0.7. That’s possible with an L tweak value of 0.93, because 0.93 is higher than the neutral value for Oklab’s lightness (0.63) by 0.3.
Before, I gave an example that desaturates colors and increases contrast. How about some other options?
// This lightens significantly and increases saturation slightly.
// Colors that get too light lose colorful-ness, so the saturation boost helps keep things vibrant.
colorfulBatch.setTweak(0.7f, 0.6f, 0.6f, 0.5f);

// This darkens slightly, increases saturation sharply, and also lowers contrast significantly.
// This is somewhat of a dizzying-fog effect, and combined with changing batch colors, it can be a "bad trip" effect.
colorfulBatch.setTweak(0.4f, 0.8f, 0.8f, 0.3f);

// This is a fire effect that changes over time.
// First we set the tweak to reduce lightness range slightly and reduce the range of A (green-to-red) heavily.
colorfulBatch.setTweak(0.45f, 0.3f, 0.5f, 0.5f);
// Then, we set the color to raise lightness back up a little (with the reduced range, this removes the darkest levels).
// This also sharply pushes A over toward red, away from green or cyan. With its reduced range, cyan won't appear.
// B changes over time, but I didn't actually test this code, and it isn't optimal even if it works. Use your favorite
// 1D noise implementation here in place of the sin and cos and you'll get better results. B only changes between 0.5
// and 0.9 here, but that can change the "fire" from red to orange to yellow. Alpha is the normal 1f.
colorfulBatch.setColor(0.6f, 0.8f,
        MathUtils.sin(MathUtils.cos(TimeUtils.millis() * 0.002f) * MathUtils.PI) * 0.2f + 0.7f, 1f);
The last example changes the tweaks for A and B separately, which helps refine the changes it makes to the result.
Color Manipulation
There’s a lot to say here, and I’ll have to skip a fair amount. Poke around ColorTools and you’ll find some interesting methods, hopefully.
Float Color Dissection
The ColorTools class in each color space has a lot of methods for pulling apart float colors and getting specific
information. This can be simple, like ColorTools.red() in the RGB or Oklab color spaces (it gets the red channel value
or computes it for Oklab). This can also be less-simple, like ColorTools.hue(), which has to do a big conversion to
get the HSL-format hue (but you can see those hues in the RGB palettes linked above). Most of these methods are
straightforward to use. Some do require some explanation, like ColorTools.chroma() in Oklab, which gets how colorful
a color is absolutely, rather than how saturation is relative to the highest possible saturation at that hue and
lightness. Two colors with the same chroma should be pretty much equally far from gray.
Editing Colors
There are methods like editRGB() and editOklab() in the corresponding color space packages, which can be a good
choice if you want to make many changes at once. Otherwise, straightforward single-purpose methods like lighten(),
darken(), enrich() (which raises colorfulness), dullen() (which lowers colorfulness), and specific methods for
the color space may do what you want. There are also options to request colors by HSL values, with two variants of those
in Oklab plus another that uses “HCL” (using absolute chroma instead of relative saturation). Some editing methods
mention limitToGamut() in their JavaDocs; this takes any colors that may have been edited out of a valid range, and
brings them back into the valid range, typically keeping their lightness, but changing their saturation.
Color Mixing
The good stuff. FloatColors (not in a color space package) has the lerpFloatColors() and mix() methods, which
combine two or more colors. lerpFloatColors() allows you to specify how much the second color should affect the first,
such as 0.5 for an even mix, 0.25 to favor the first color, or 0.75 to favor the second color. While mix() doesn’t
have a way to set the degree of bias toward one color or another, it can mix more than two colors, all as an even mix.
Using lerpFloatColors() with changing values for its last parameter (change) leads to smooth blends, which can be
used for gradients or changes over time. That’s what Beatrix used for this slick effect:
Future Directions
I’d like to have some more features for creating gradients. I’m also fairly sure something else will come up.
It was no longer shining out; it was pouring out; and as the shapeless stream of unplaceable colour left the well, it seemed to flow directly into the sky. — The Colour Out of Space, H.P. Lovecraft
colorful-gdx is an open source project and contributions and ideas are welcome! …Also, bug reports are welcome.